Use Case: Building templates from scratch
This page covers the basics of building templates in the CEDAR Workbench, with a special focus on CDEs.
- Introduction
- Step-by-step guide: build a template
- Step 1 - Navigate to your workspace
- Step 2 - Create a new template object
- Step 3 - Add CDEs to your template
- Step 4 - Configure CDE options
- Step 5 - Save your template
- Step 6 - Share your template
Introduction
NCI's Form Builder allows users to build forms that contain modules with questions. Equivalent functionality is available in the CEDAR Workbench, i.e., you can build templates that contain elements with fields. A key difference between the platforms is that the CEDAR Workbench allows fields to exist at the root level outside of elements.
Refer to the following graphical representations for comparison:
Form Builder
|-- Form
|   |-- Module
|   |   |-- Question/CDE
|   |   |-- Question/CDE
|   |-- Module
|   |   |-- Question/CDE
|   |   |-- Question/CDE
CEDAR Workbench
|-- Template
|   |-- Field/CDE
|   |-- Field/CDE
|   |-- Element
|   |   |-- Field/CDE
|   |   |-- Field/CDE
|   |-- Element
|   |   |-- Field/CDE
|   |   |-- Field/CDE
Before getting started in the CEDAR Workbench, it may be helpful to read through and consider the following points:
Searching for CDEs
The CDE Browser is currently perceived to have richer search capabilities for locating CDEs. You may want to consider using the CDE Browser to find CDEs of interest, and record their Public IDs before beginning your work in the CEDAR Workbench.
Modifying CDE options
CDEs are imported into the CEDAR Workbench with a "published" status. Published artifacts are considered final, which means they can't be modified or deleted. When you add a published CDE to a template, you have the opportunity to edit some common options, e.g.:
- required vs. optional
- specify a default value
- specify a cardinality
However, other CDE options such as the name, help text, alternate labels, etc., are unmodifiable. If you want to build a template using CDEs as they are, no special action is needed. If you're not satisfied with the content of a CDE and want to make changes, there are a couple of options for proceeding:
- Modify the CDE externally, and wait for the modified version to get imported into the CEDAR Workbench (CDEs are imported on a nightly basis).
- Make a copy of the CDE and implement your changes. Once you create a copy of a CDE, you are the owner of the new object and have the necessary privileges to make changes.
A section with instructions for making copies of CDEs is included later in this tutorial.
Grouping CDEs
This page describes the process of adding individual CDEs to templates. One advantage to this approach is that you are allowed to make edits to CDE's common options, as well as edits to all other field types from within a template container. The CEDAR Workbench offers the ability to group CDEs together into "elements" so that multiple CDEs can be added to a template at once. The tradeoff for this approach is that the CDEs and other fields contained in elements are unmodifiable once the element has been added to a template.
More detail and instructions for creating elements with multiple CDEs are given on a separate page. Understanding how to build templates in the CEDAR Workbench is not a prerequisite for creating elements.
Build a Template Step-By-Step
This section of the documenation will walk you through the mechanical steps of creating a template in the CEDAR Workbench that contains several CDEs.
Step 1 - Go to your Workspace
Navigate to the CEDAR Workbench and make sure you're logged in. If you need help creating an account and logging in, see the Accounts and Logging In section of this guide.
Click the Workspace link in the upper-left portion of the window to start out in your personal workspace.
Step 2 - Create a new template object
Click on the "New +" button in the upper-left portion of the window, and select "Template" from the resulting dropdown menu.
This will create a new template object and open the template designer view:
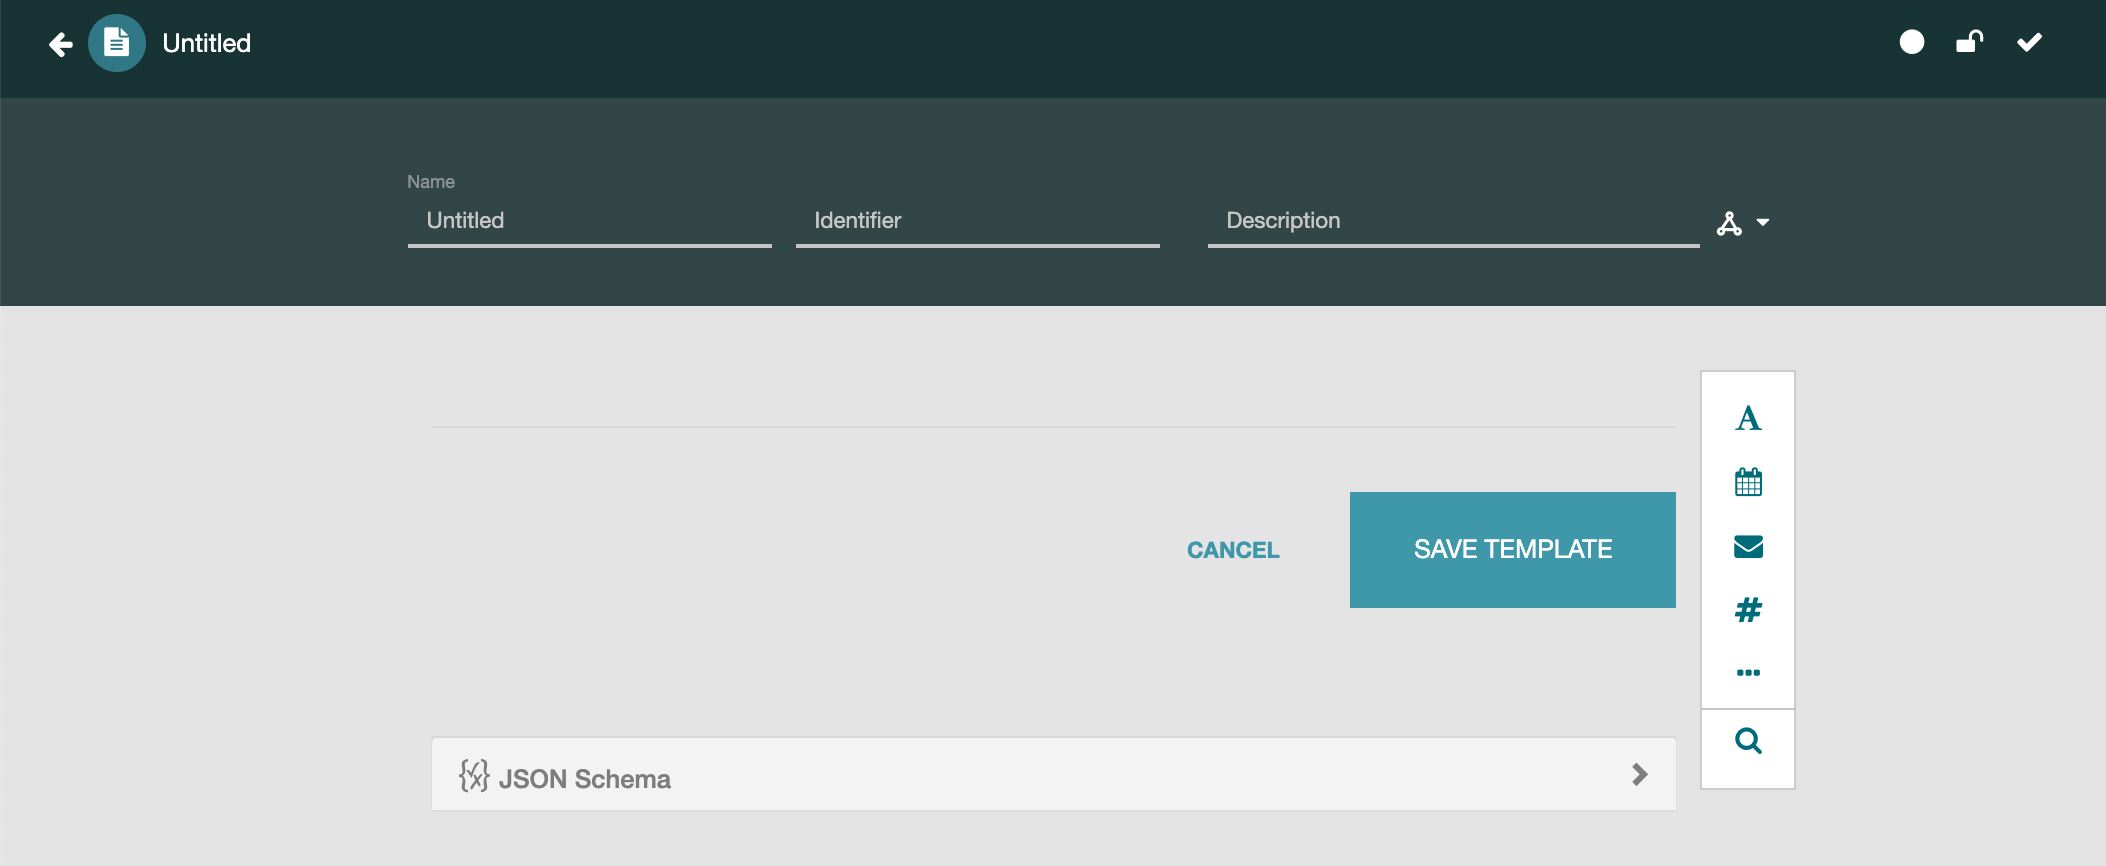
In the dark gray header at the top of the page, enter a name and description for your template, leaving the Identifier field blank.
Click the "SAVE TEMPLATE" button. This will ensure that your new template is saved in the CEDAR Workbench. If you need to exit your browser at any point and return to this tutorial at a later time, your new template will appear in your workspace, and you can double-click on it to reopen the template designer.
Step 3 - Add some CDEs
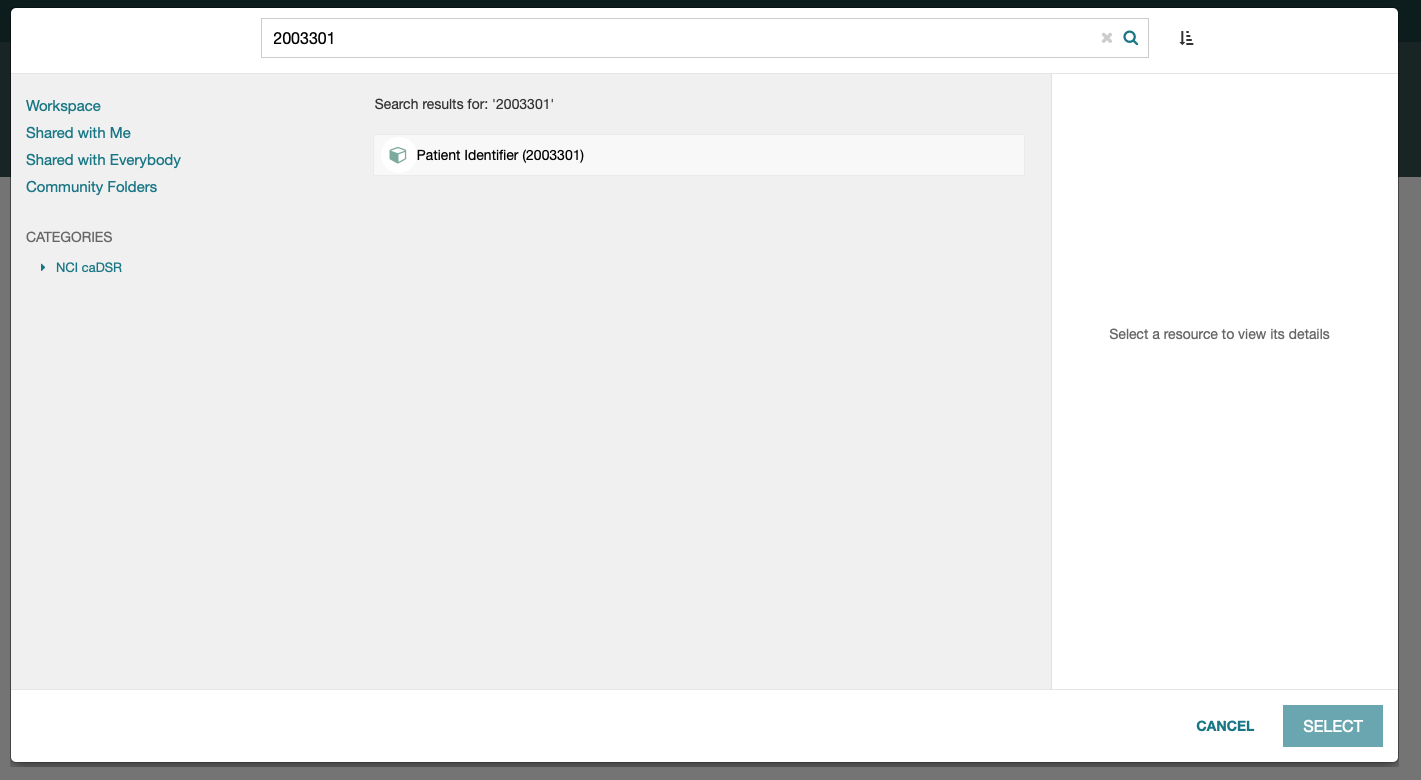
Locate the vertical selector toolbar on the right-hand side of the template desinger view and click the "Search for fields and elements" button (depicted with a magnifying glass icon). This will launch a modal dialog where you can use the Search bar across the top to locate the desired CDE by entering, e.g., the Public ID or double quoted title and pressing the Enter key:
If multiple items are returned in the search results, it can be particularly helpful to click on the individual entries to see additional information such as the description, location, permissions, version numbers, etc.:
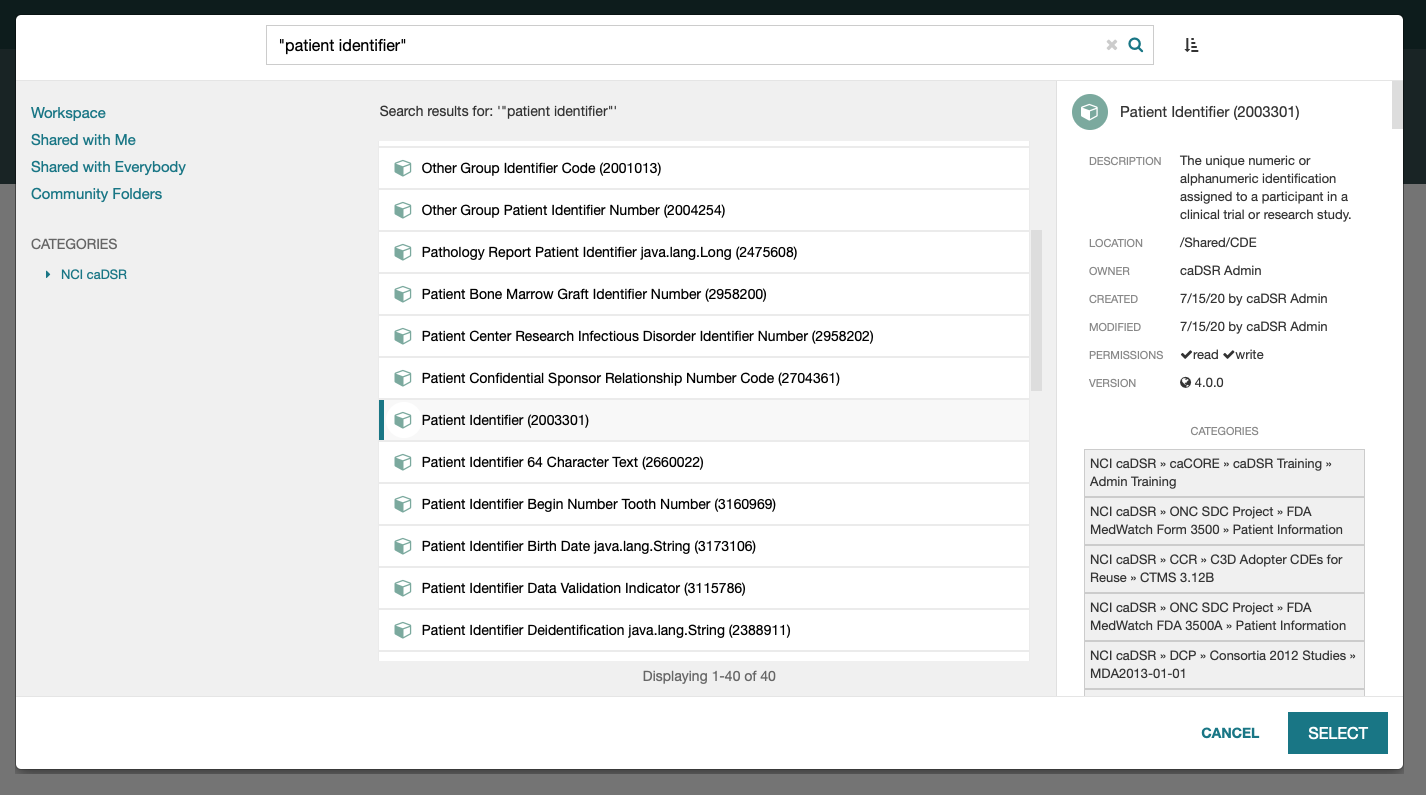
Note: In addition to using the Search bar at the top of the modal dialog, you can browse for CDEs by location using the links in the top left, or browse by category using the NCI caDSR tree widget.
Once you locate the desired CDE, select it in the middle pane and click the "SELECT" button. This will insert the CDE into your template and return to the template designer view.
Feel free to practice by adding several more CDEs to your template.
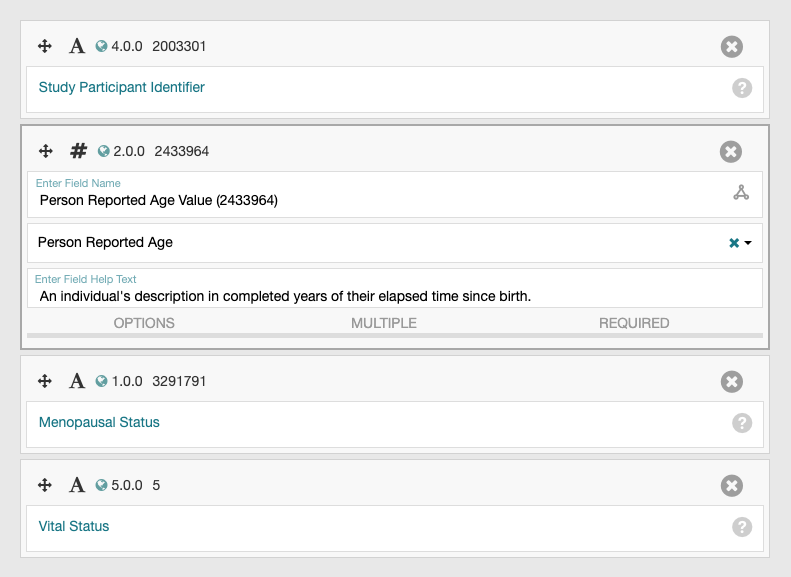
Note: When a CDE or any other type of artifact is added to a template, it is initially show in an expanded view and others are collapsed. To expand an artifact and collapse others, simply click on the header bar of any given artifact. The following screen shot depicts a template with four CDEs where the second CDE is expanded, and all others are collapsed:
There are several helpful tips to keep in mind when populating templates:
- Click the Delete button ('X' icon) in the upper right corner to delete CDEs and other artifacts
- Click and drag on CDEs and other artifacts to easily reorder them in your template
- Remember to click the SAVE TEMPLATE button periodically to save your changes
The CEDAR Workbench offers many other types of artifacts that you can add to templates beyond CDEs, e.g., multiple choice and checkbox style fields, phone numbers, images, etc. All of these fields are available via the right hand vertical selector toolbar in the template designer. For more detail on artifacts outside of CDEs, you may find the following sections of the "Building Basic Templates" portion of the user guide helpful:
Step 4 - Configure CDE options
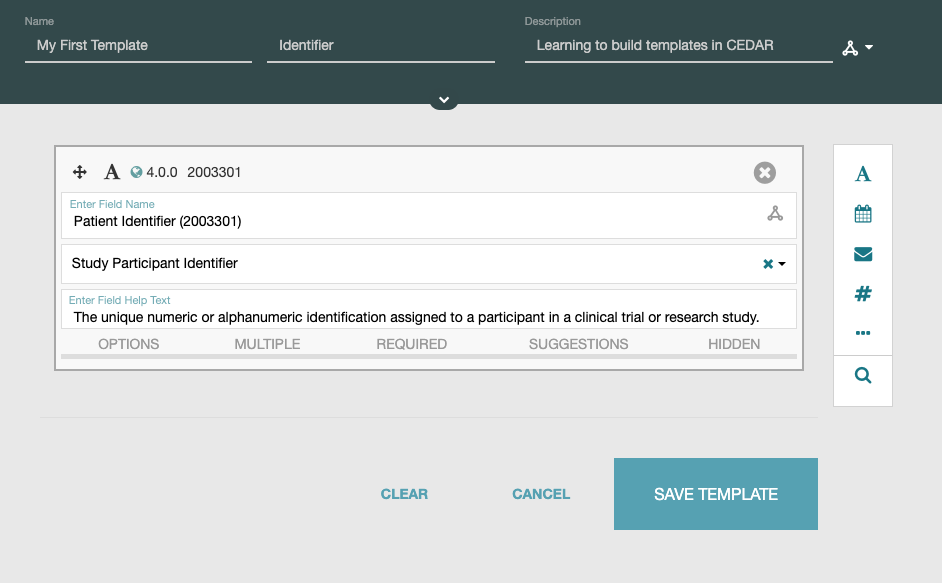
As indicated in the introduction, there are certain CDE options that you are allowed to configure. For example, if you want to indicate that the CDE is a required field, click the REQUIRED link at the bottom of the CDE and use the slider to indicate YES or NO. Another example is clicking on the MULTIPLE link to indicate whether the CDE can appear multiple times in a template, as well as the minimum and maximum number of occurrences.
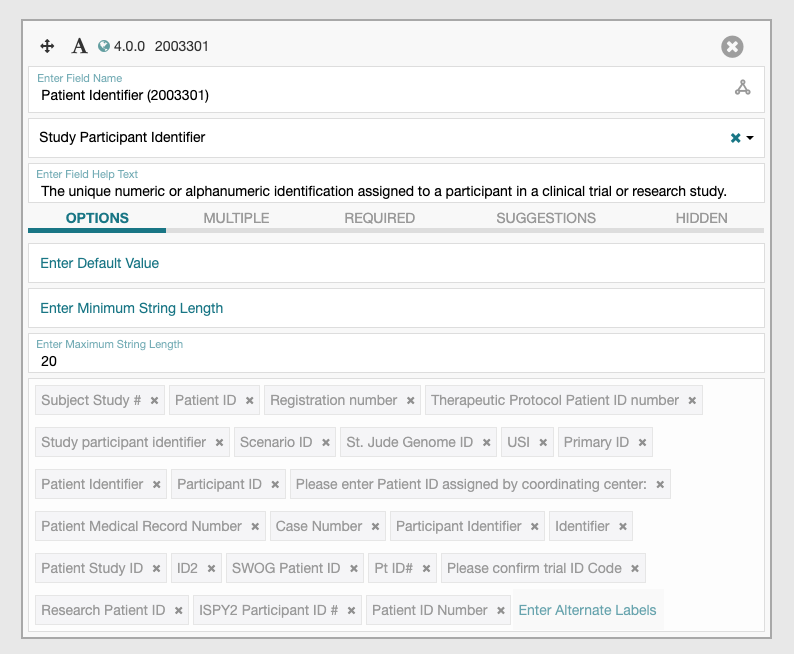
If you want to change question text, which is referred to as the "preferred label" in the CEDAR Workbench, you can place your mouse in the "Enter Preferred Label" text box (second text box from the top) to see a dropdown list of available options. If the CDE has a large number of options for the preferred label, the CEDAR Workbench offers the ability to view all of the options depicted as a tag group by clicking the OPTIONS link at the bottom of the CDE:
Some CDEs have permissible values, which are referred to in the CEDAR Workbench as simply "values". If you added such a CDE to your template, there will be a VALUES link at the bottom of the CDE:
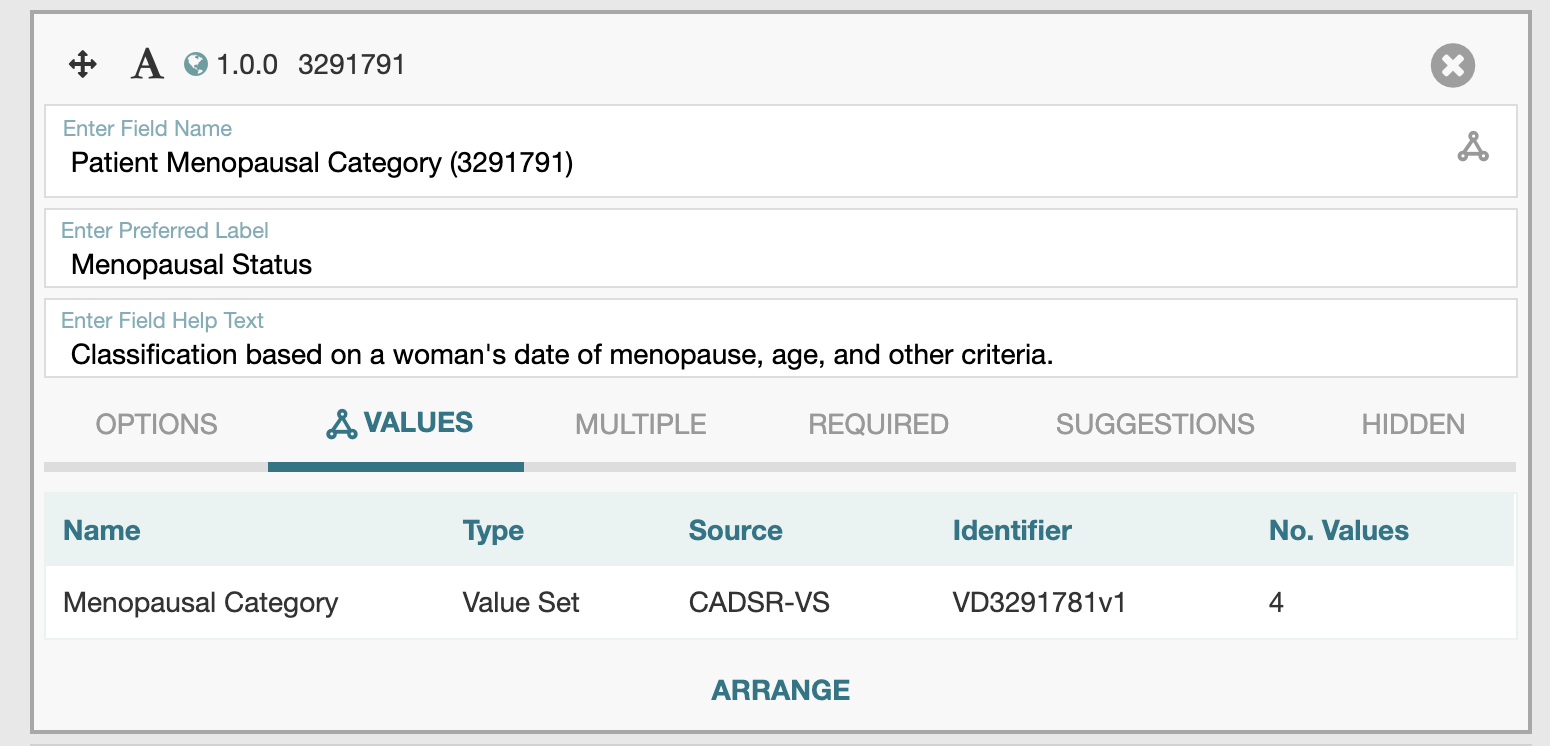
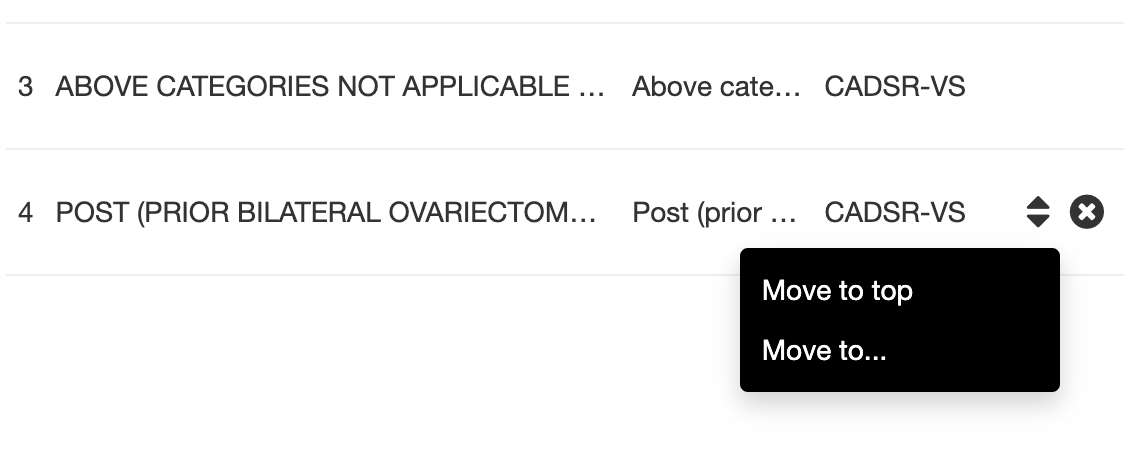
To view the values, click the VALUES link at the bottom of the CDE, then click the ARRANGE link, which launches the Arrange Values modal dialog with the list of allowed values:
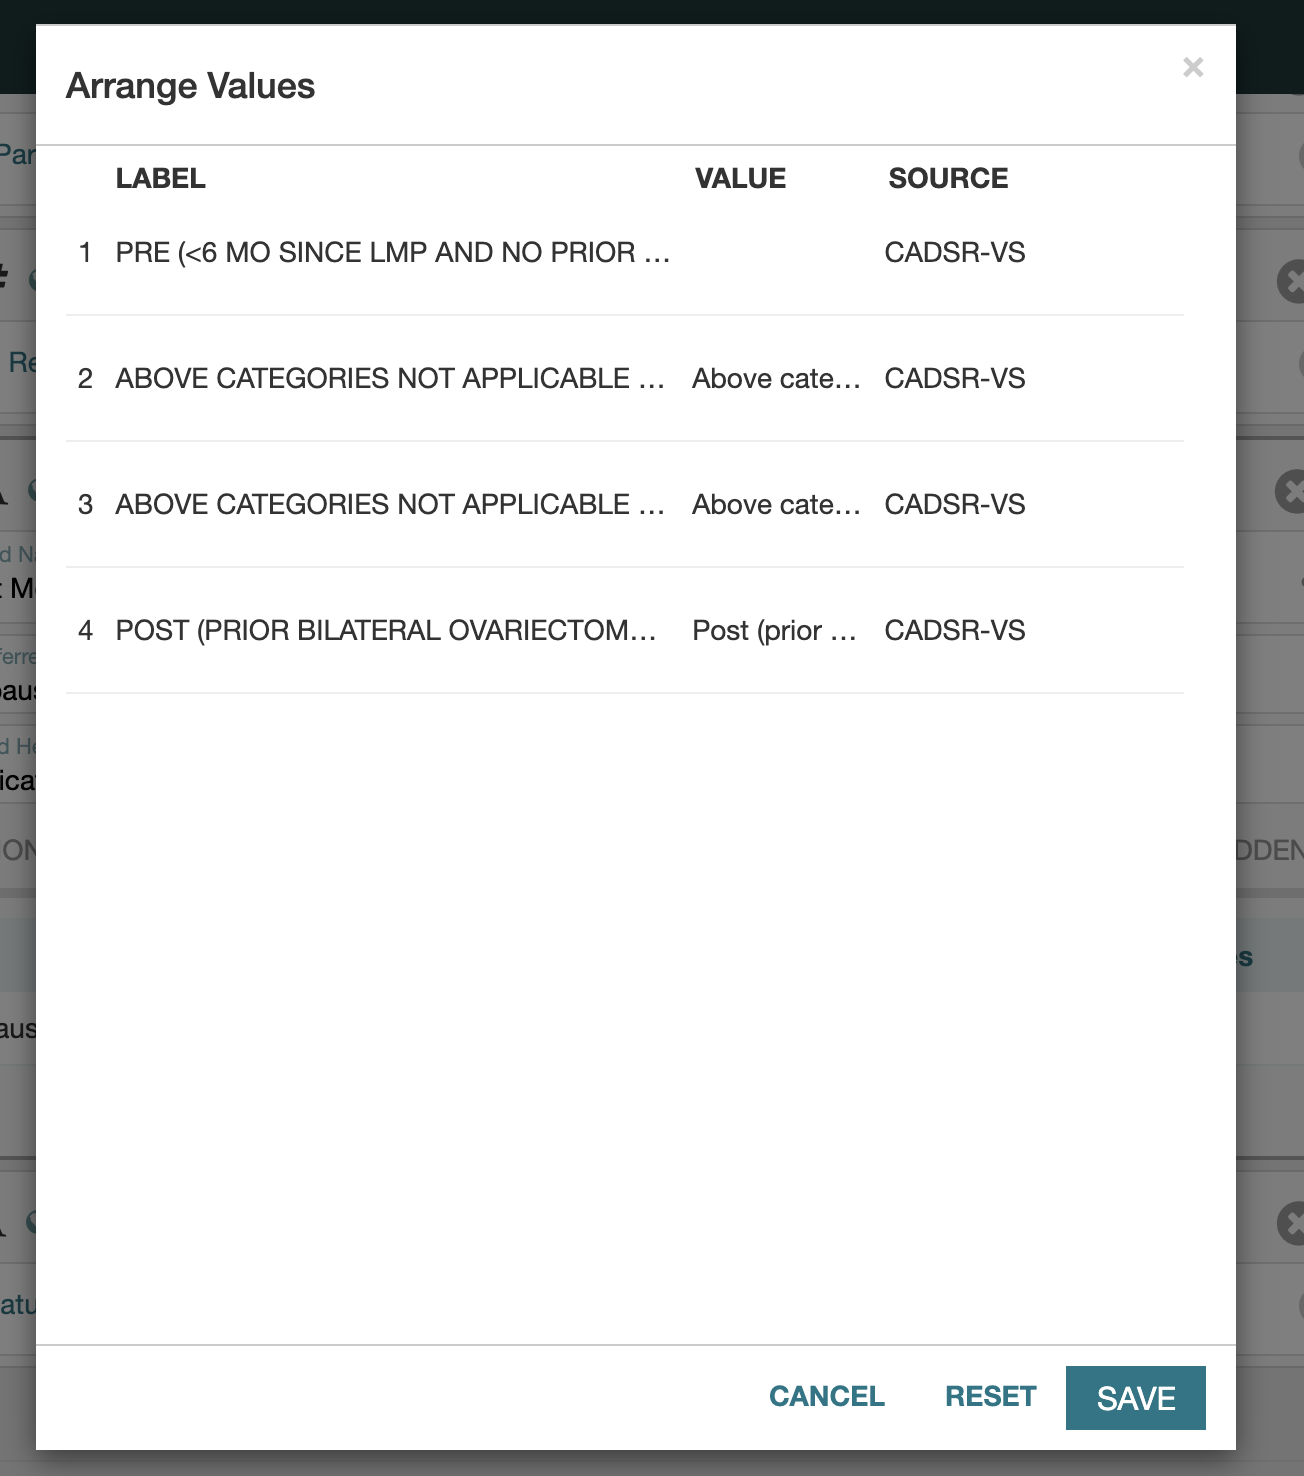
Hover your mouse over individual values to display right hand icons that allow you to either delete a value, or move the value to the top and/or a specific position in the list.
Adding values is not currently possible from within the CEDAR Workbench. Requests for new values should be submitted via email to the following address: caDSR.RA@mail.nih.gov.
Step 5 - Save your template
Now that you have added several CDEs and possibly other artifacts to your template, click the SAVE TEMPLATE button and use the left arrow in the top left corner of the main window to return to your workspace. Your new template will be displayed in the middle pane with "Populate" and "More" icons on the right-hand side.
If you want to get a sense for how your template will look to someone that is filling it out, click either the Populate icon, or click the More icon and select the Populate menu item. This will open your template in the metadata editor where you can populate an instance of your template:

If you fill out your template and click the SAVE button, the CEDAR Workbench will create an instance of your template and save it in the same directory. To view the instance, click the left arrow in the top left corner of the main window to return to your workspace. The new instance will have the same name as your template with the word "metadata" tacked onto the end:

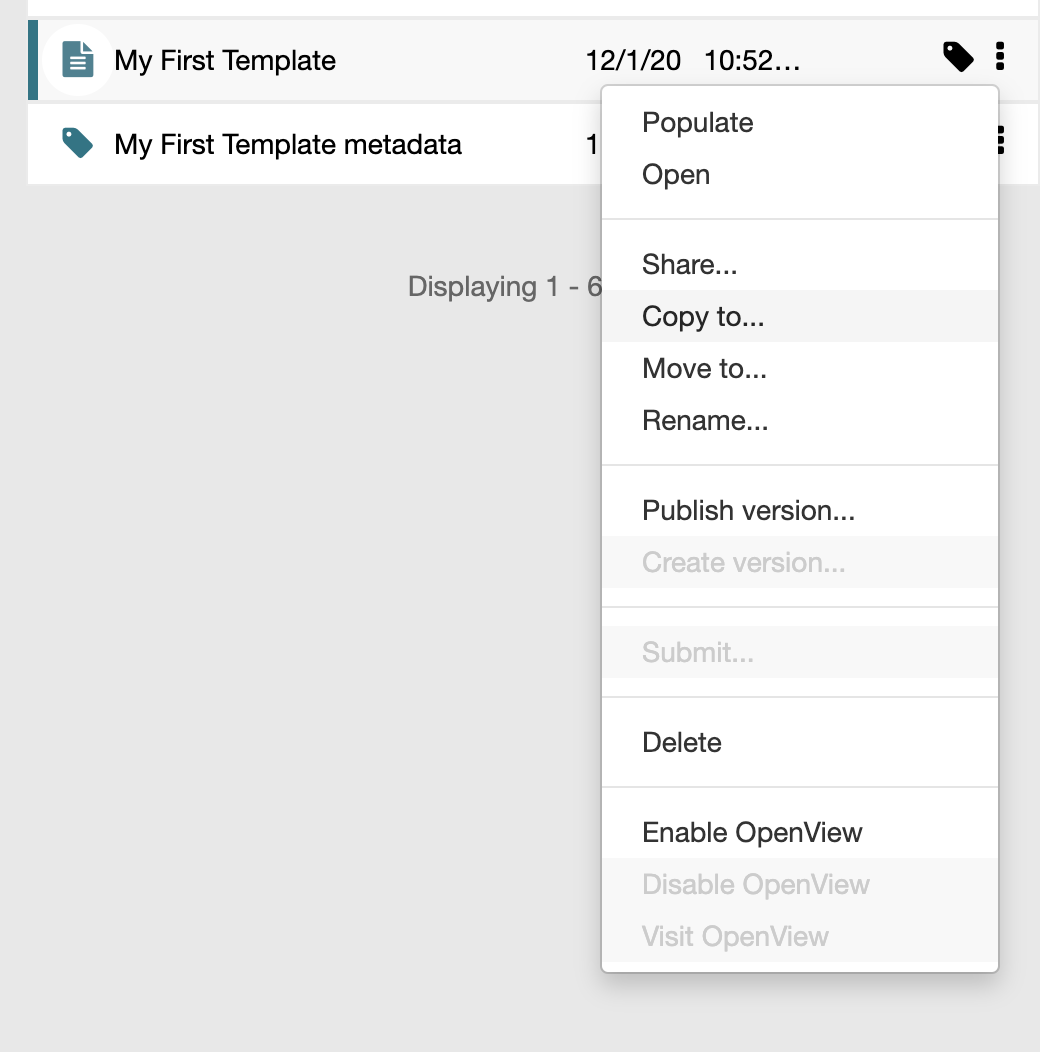
If you want to organize your templates using folders, you can create new folders by clicking the "New +" button at the top left and selecting Folder from the resulting dropdown menu. Once you have your desired folder structure in place, you can click on the More buttons associated with your templates and select the "Copy to..." and/or "Move to..." menu items to relocate your templates:
The More menu also contains options for renaming and deleting your templates.
Step 6 - Share your template
When you create a template in your workspace or inside of a personal folder structure, you are the only person that can view and edit your template. The CEDAR Workbench facilitates the ability to grant other users and groups of users the ability to view and/or edit your templates.
If you wish to share your template with another user or group, click the More icon and select the "Share..." menu item to bring up the "Share settings" modal dialog:
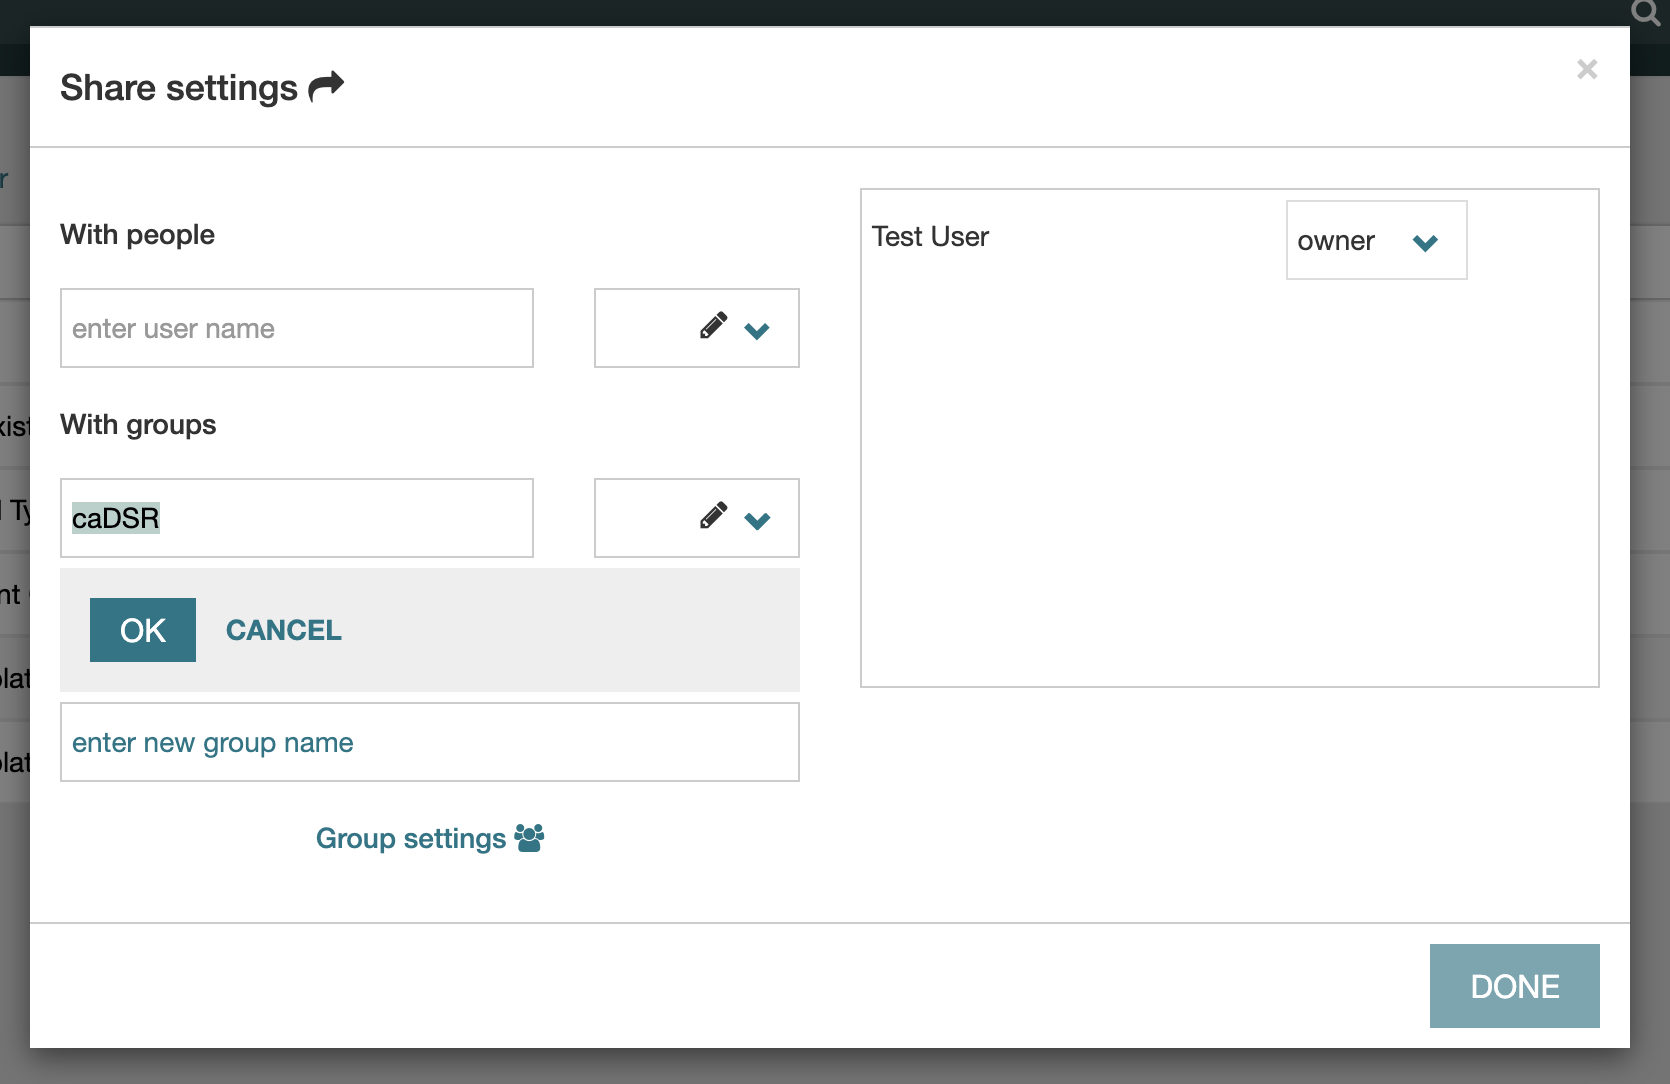
Use the "With people" section to locate other users with whom you would like to share your template. After selecting a user name, you can use the dropdown on the right hand side of the user name to specify whether the user has read, write, or owner privileges for your template.
Use the "With groups" section to search for group names with whom you would like to share your template. The same read, write, and owner privileges are available to groups.