CEDAR MCPs Tutorial
Good metadata is still made by hand. Someone reads a dataset, its data dictionary, a protocol, and a paper, then retypes what they learned into a structured form, choosing a standardized term for each value. It is slow work, and it is exactly the kind of reading and restructuring that a large language model does well.
A language model on its own, though, is probably not the best tool for the final step. Ask one to write a metadata template and it will cheerfully invent field names, guess ontology identifiers that do not resolve, and emit something that looks like CEDAR but does not validate. The reasoning is useful. The unaided output is not trustworthy.
The Model Context Protocol (MCP) closes that gap. An MCP server hands the model a set of real tools backed by real services. The model still decides what the template should contain and which vocabularies fit; the servers do the parts that have to be exact: resolving a name to a genuine ontology IRI, assembling a schema the CEDAR validator accepts, and rendering that schema as an actual CEDAR form. This tutorial walks the smallest end-to-end example of that division of labor.
The Four MCP Servers
Building a template this way touches four different tasks, and no single service does all of them well. Finding the right ontology term is a search problem against BioPortal. Turning a design into a valid CEDAR schema is a modeling and validation problem. Seeing what that schema looks like is a rendering problem. Keeping and sharing the result is a storage problem. So we built four small MCP servers, one for each task, and an assistant orchestrates them. Together they carry a template from a plain-language description all the way to a stored, standards-based artifact, without the model ever having to invent a schema or an identifier on its own.
The MCPs are:
- BioPortal term server: searches BioPortal and resolves names to real ontology classes and ontologies, each with a resolvable IRI.
- CEDAR artifact server: builds, validates, and renders CEDAR templates and instances as YAML.
- CEDAR embeddable-editor server: renders a template or an instance as a form in your browser, so you can see what the YAML actually produces.
- CEDAR REST server: uploads and manages artifacts on a CEDAR server, so you can keep and share what you built.
Setup instructions are in the Appendix.
What We Will Build
In this tutorial you build real CEDAR artifacts by conversation alone: a template, the specification that defines how a kind of data should be described, and an instance, the metadata that fills that specification in. You describe what you want in plain language, and an assistant backed by the four MCP servers does the rest: it finds the right ontology terms, assembles a valid template, renders it as a form you can inspect, and fills an instance of it, right up to an artifact you could store and share. There is no CEDAR Workbench to click through and no schema to hand-write. That path, from a sentence to a standards-based artifact, is what we are demonstrating.
Concretely, we build one template, Tissue Sample, with two plain identifier fields and three fields constrained to ontology terms, and then populate one instance of it. Two companion tutorials do this by hand: the CEDAR Tutorial walks through creating folders, templates, and fields in the Workbench, and the CEDAR Controlled Term Tutorial clicks through the term picker to constrain fields to ontology terms, using this very Tissue Sample template. Everything those two accomplish by pointing and clicking, you accomplish here by describing it in plain language. You need an assistant with the four servers configured and about ten minutes.
Step 1: Describe What You Want
Everything starts with a plain-language request. You do not write YAML; you say what the template should hold:
Build a CEDAR template called "Tissue Sample". Give it two plain text fields, Sample ID (required) and Lab ID. Then add three fields constrained to ontology terms: Cell Type, allowing any term from the Cell Ontology; Organ, allowing any organ from Uberon; and Assay Type, allowing three specific assays: histopathology, imaging, and microscopy.
Everything after this is the assistant working. It happens in three moves: resolve the terms, assemble the template, and preview it.
Step 2: Resolve the Terms
The assistant does not take ontology identifiers from memory. For each controlled
field it asks the BioPortal server, turning the names in your request into real
classes and ontologies. To bind Cell Type to a whole ontology it calls
find_ontology; to find the organ class in Uberon and the assay classes in OBI
it calls find_class, scoped to the right ontology.
Each result carries the identifier the template actually needs. The search for organ in Uberon, for instance, comes back with a resolvable IRI:
{ "class_iri": "http://purl.obolibrary.org/obo/UBERON_0000062",
  "pref_label": "organ",
  "ontology_acronym": "UBERON" }
The Cell Ontology resolves to the acronym CL, and histopathology assay in OBI
resolves to OBI_0002564. These are real, dereferenceable IRIs. The model has
looked each one up instead of guessing it, which is the whole reason the finished
template will point at terms that other people and other programs can resolve.
Step 3: Assemble the Template
With real IRIs in hand, the assistant builds the template on the CEDAR artifact server. It creates the template, adds each field, and attaches each field's value constraint. The three controlled fields take three different shapes of constraint. Cell Type is bound to an entire ontology, Organ to a branch (the organ class and everything beneath it), and Assay Type to a hand-picked list of classes. The server validates the artifact as it is built, so what comes back is a well-formed CEDAR template, rendered as YAML:
type: template
name: Tissue Sample
description: A tissue-sample record whose fields are constrained to ontology terms.
children:
  - key: sample-id
    type: text-field
    name: Sample ID
    description: Local identifier for this tissue sample
    configuration:
      required: true
  - key: lab-id
    type: text-field
    name: Lab ID
    description: Identifier of the lab that produced the sample
  - key: cell-type
    type: controlled-term-field
    name: Cell Type
    description: "The cell type, from the Cell Ontology"
    datatype: iri
    values:
      - type: ontology
        acronym: CL
        ontologyName: Cell Ontology
        iri: https://data.bioontology.org/ontologies/CL
  - key: organ
    type: controlled-term-field
    name: Organ
    description: "The organ the sample came from, from Uberon"
    datatype: iri
    values:
      - type: branch
        ontologyName: Uber Anatomy Ontology
        acronym: UBERON
        termLabel: organ
        iri: http://purl.obolibrary.org/obo/UBERON_0000062
        maxDepth: 0
  - key: assay-type
    type: controlled-term-field
    name: Assay Type
    description: "How the sample was analyzed, from OBI"
    datatype: iri
    values:
      - type: class
        label: histopathology assay
        acronym: OBI
        termType: class
        termLabel: histopathology assay
        iri: http://purl.obolibrary.org/obo/OBI_0002564
      - type: class
        label: imaging assay
        acronym: OBI
        termType: class
        termLabel: imaging assay
        iri: http://purl.obolibrary.org/obo/OBI_0000185
      - type: class
        label: microscopy assay
        acronym: OBI
        termType: class
        termLabel: microscopy assay
        iri: http://purl.obolibrary.org/obo/OBI_0002119
Read down the children and you can see the request answered field by field: two
plain text-fields, then three controlled-term-fields whose values hold the
three constraint shapes, each pointing at an IRI the BioPortal server returned in
Step 2. This is compact CEDAR YAML. CEDAR also mints a stable @id for the
template, omitted here for readability.
Step 4: Preview the Template
YAML is exact but hard to picture. The embeddable-editor server renders the
template as the CEDAR form it describes, opened read-only in your browser, so you
can check the design before saving anything. The assistant calls show_template
and returns a link:
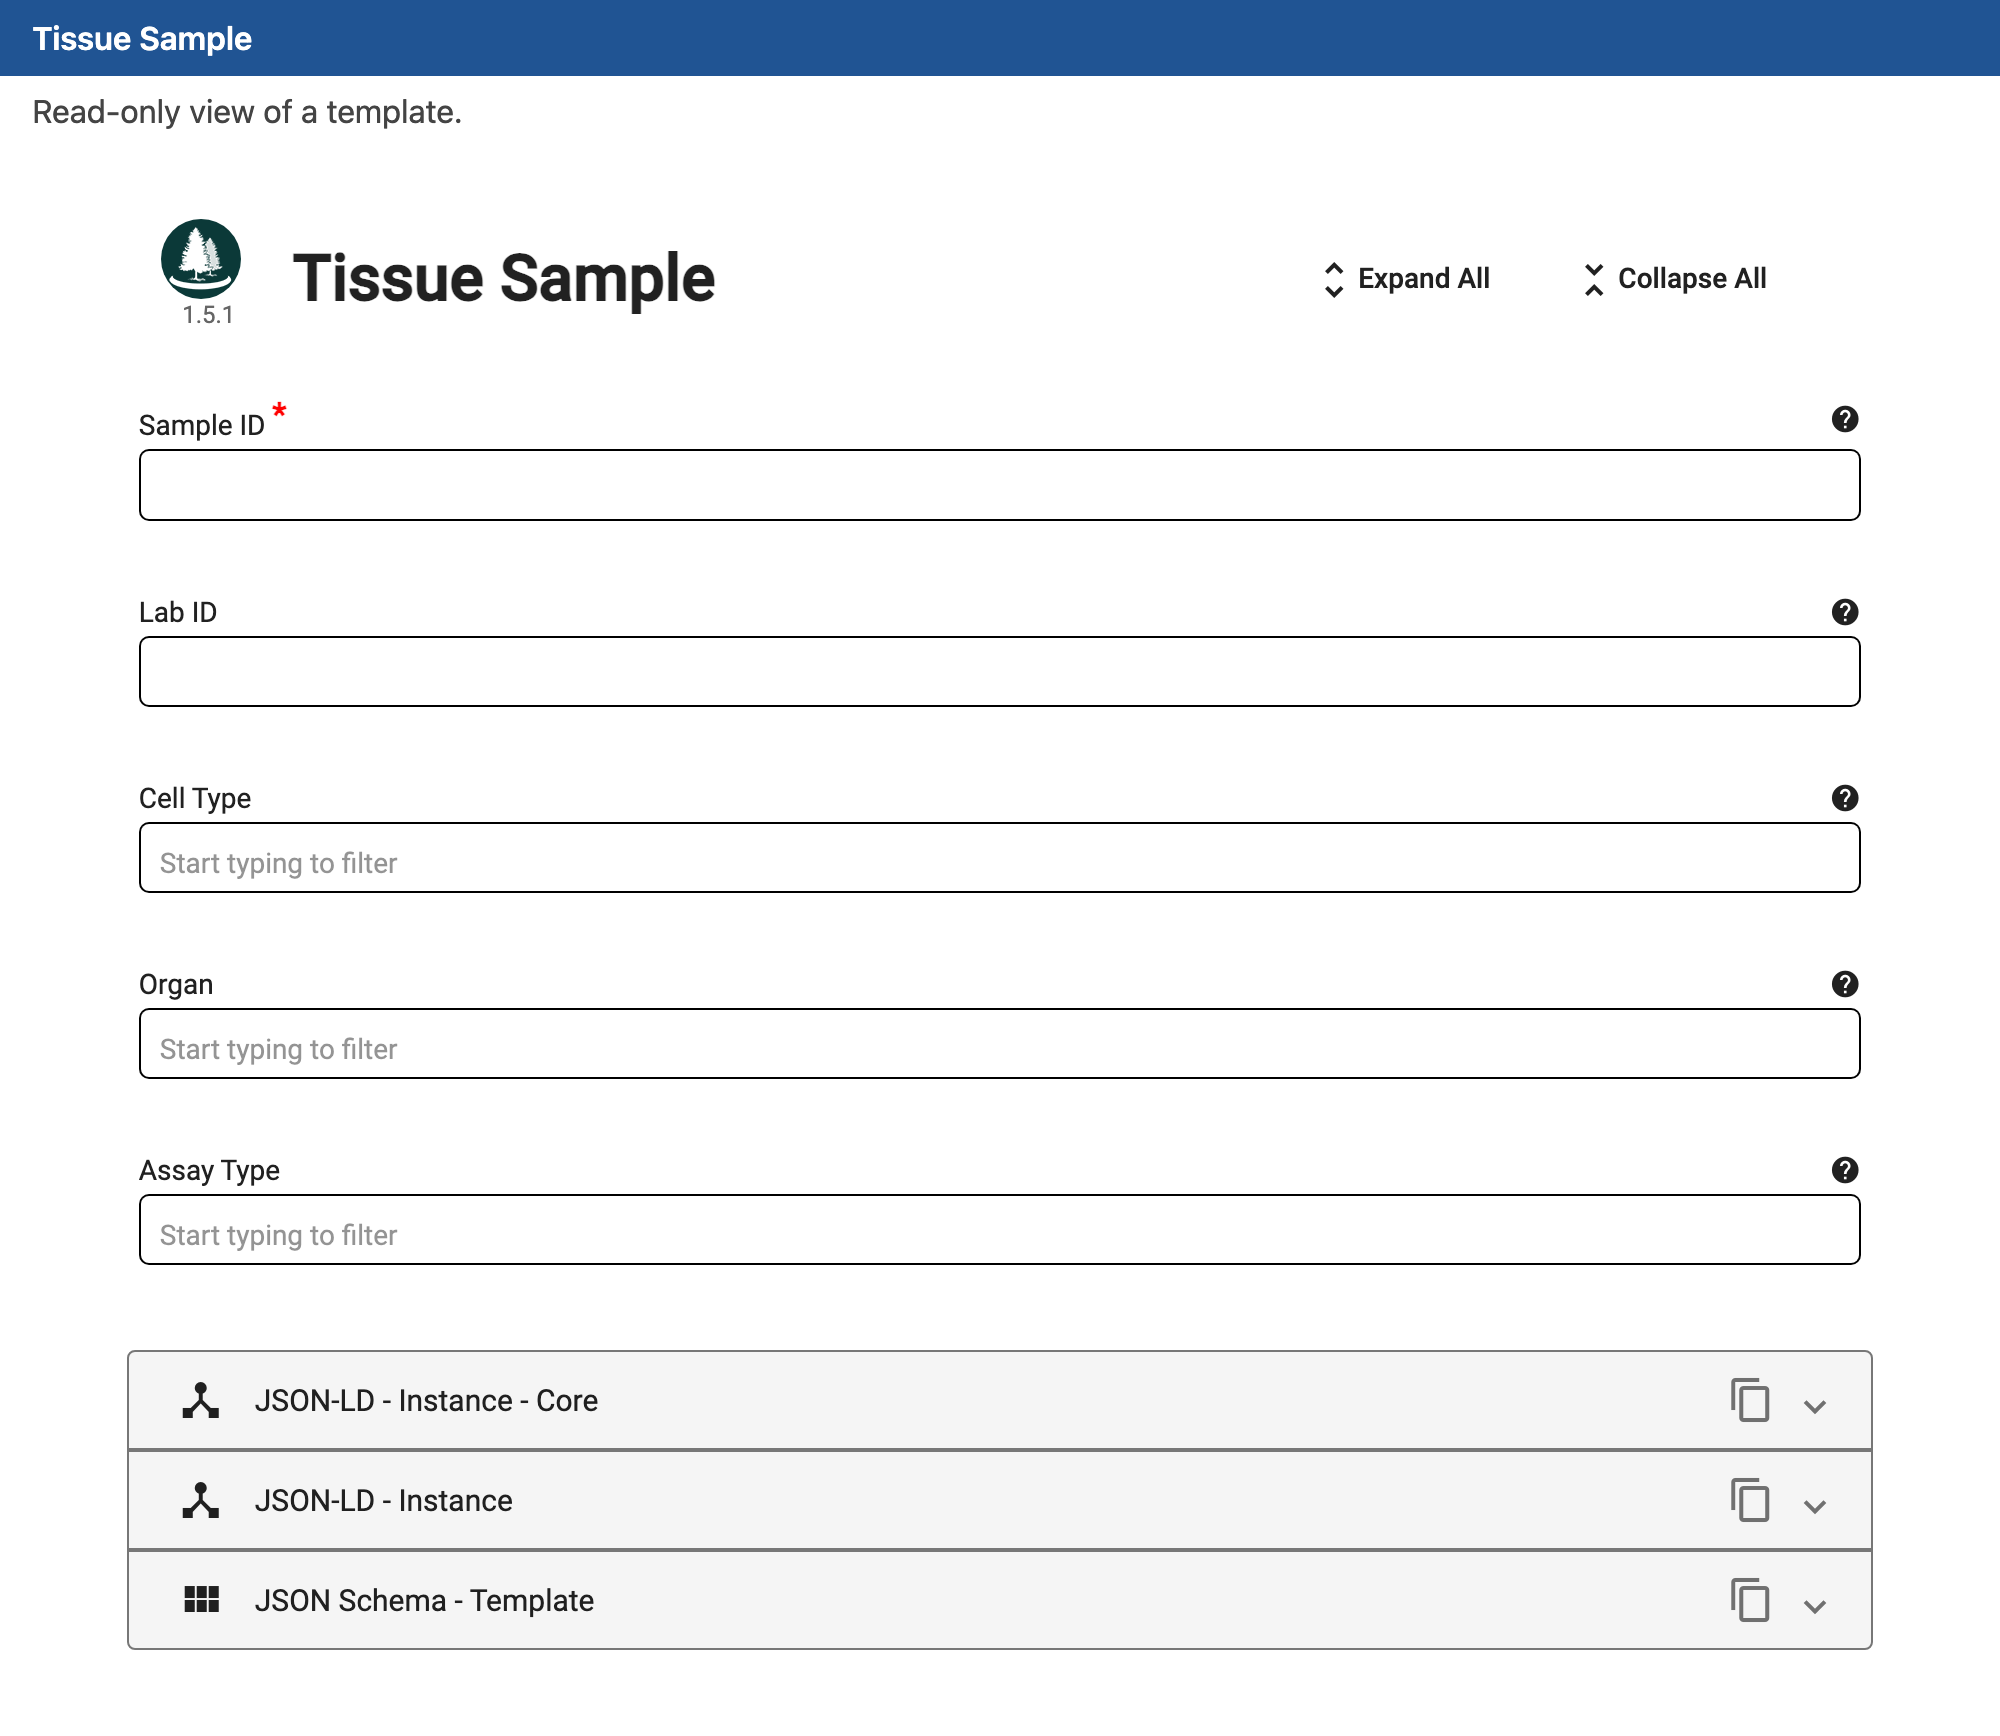
The red asterisk marks Sample ID as required. Cell Type, Organ, and Assay Type render as ontology-backed pickers, each inviting you to "Start typing to filter" its allowed terms. The panels at the bottom expose the very same template as JSON-LD and as JSON Schema, the standards-based forms CEDAR speaks natively.
Step 5: Fill an Instance
A template is a blueprint. The metadata you keep are instances of it, one per sample. Ask the assistant to fill one:
Create an instance of that template: Sample ID TS-0001, Lab ID LAB-0042, Cell Type hepatocyte, Organ liver, Assay Type histopathology assay.
The assistant resolves the three controlled values through BioPortal again (hepatocyte to a Cell Ontology class, liver to a Uberon class, histopathology assay to its OBI class), builds the instance on the artifact server, validates it against the template, and renders it:
type: instance
name: Tissue Sample TS-0001
isBasedOn: https://repo.metadatacenter.org/templates/940fa702-460a-4880-846d-d22cc168ea11
children:
  sample-id:
    value: TS-0001
  lab-id:
    value: LAB-0042
  cell-type:
    id: http://purl.obolibrary.org/obo/CL_0000182
    label: hepatocyte
  organ:
    id: http://purl.obolibrary.org/obo/UBERON_0002107
    label: liver
  assay-type:
    id: http://purl.obolibrary.org/obo/OBI_0002564
    label: histopathology assay
Notice the difference between the two kinds of value. Sample ID and Lab ID are
plain strings. The three controlled fields are id and label pairs, where the
id is a real ontology IRI and the label is the human-readable term it stands
for. isBasedOn links the instance back to the template it was filled from.
Preview it the same way, with show_instance:
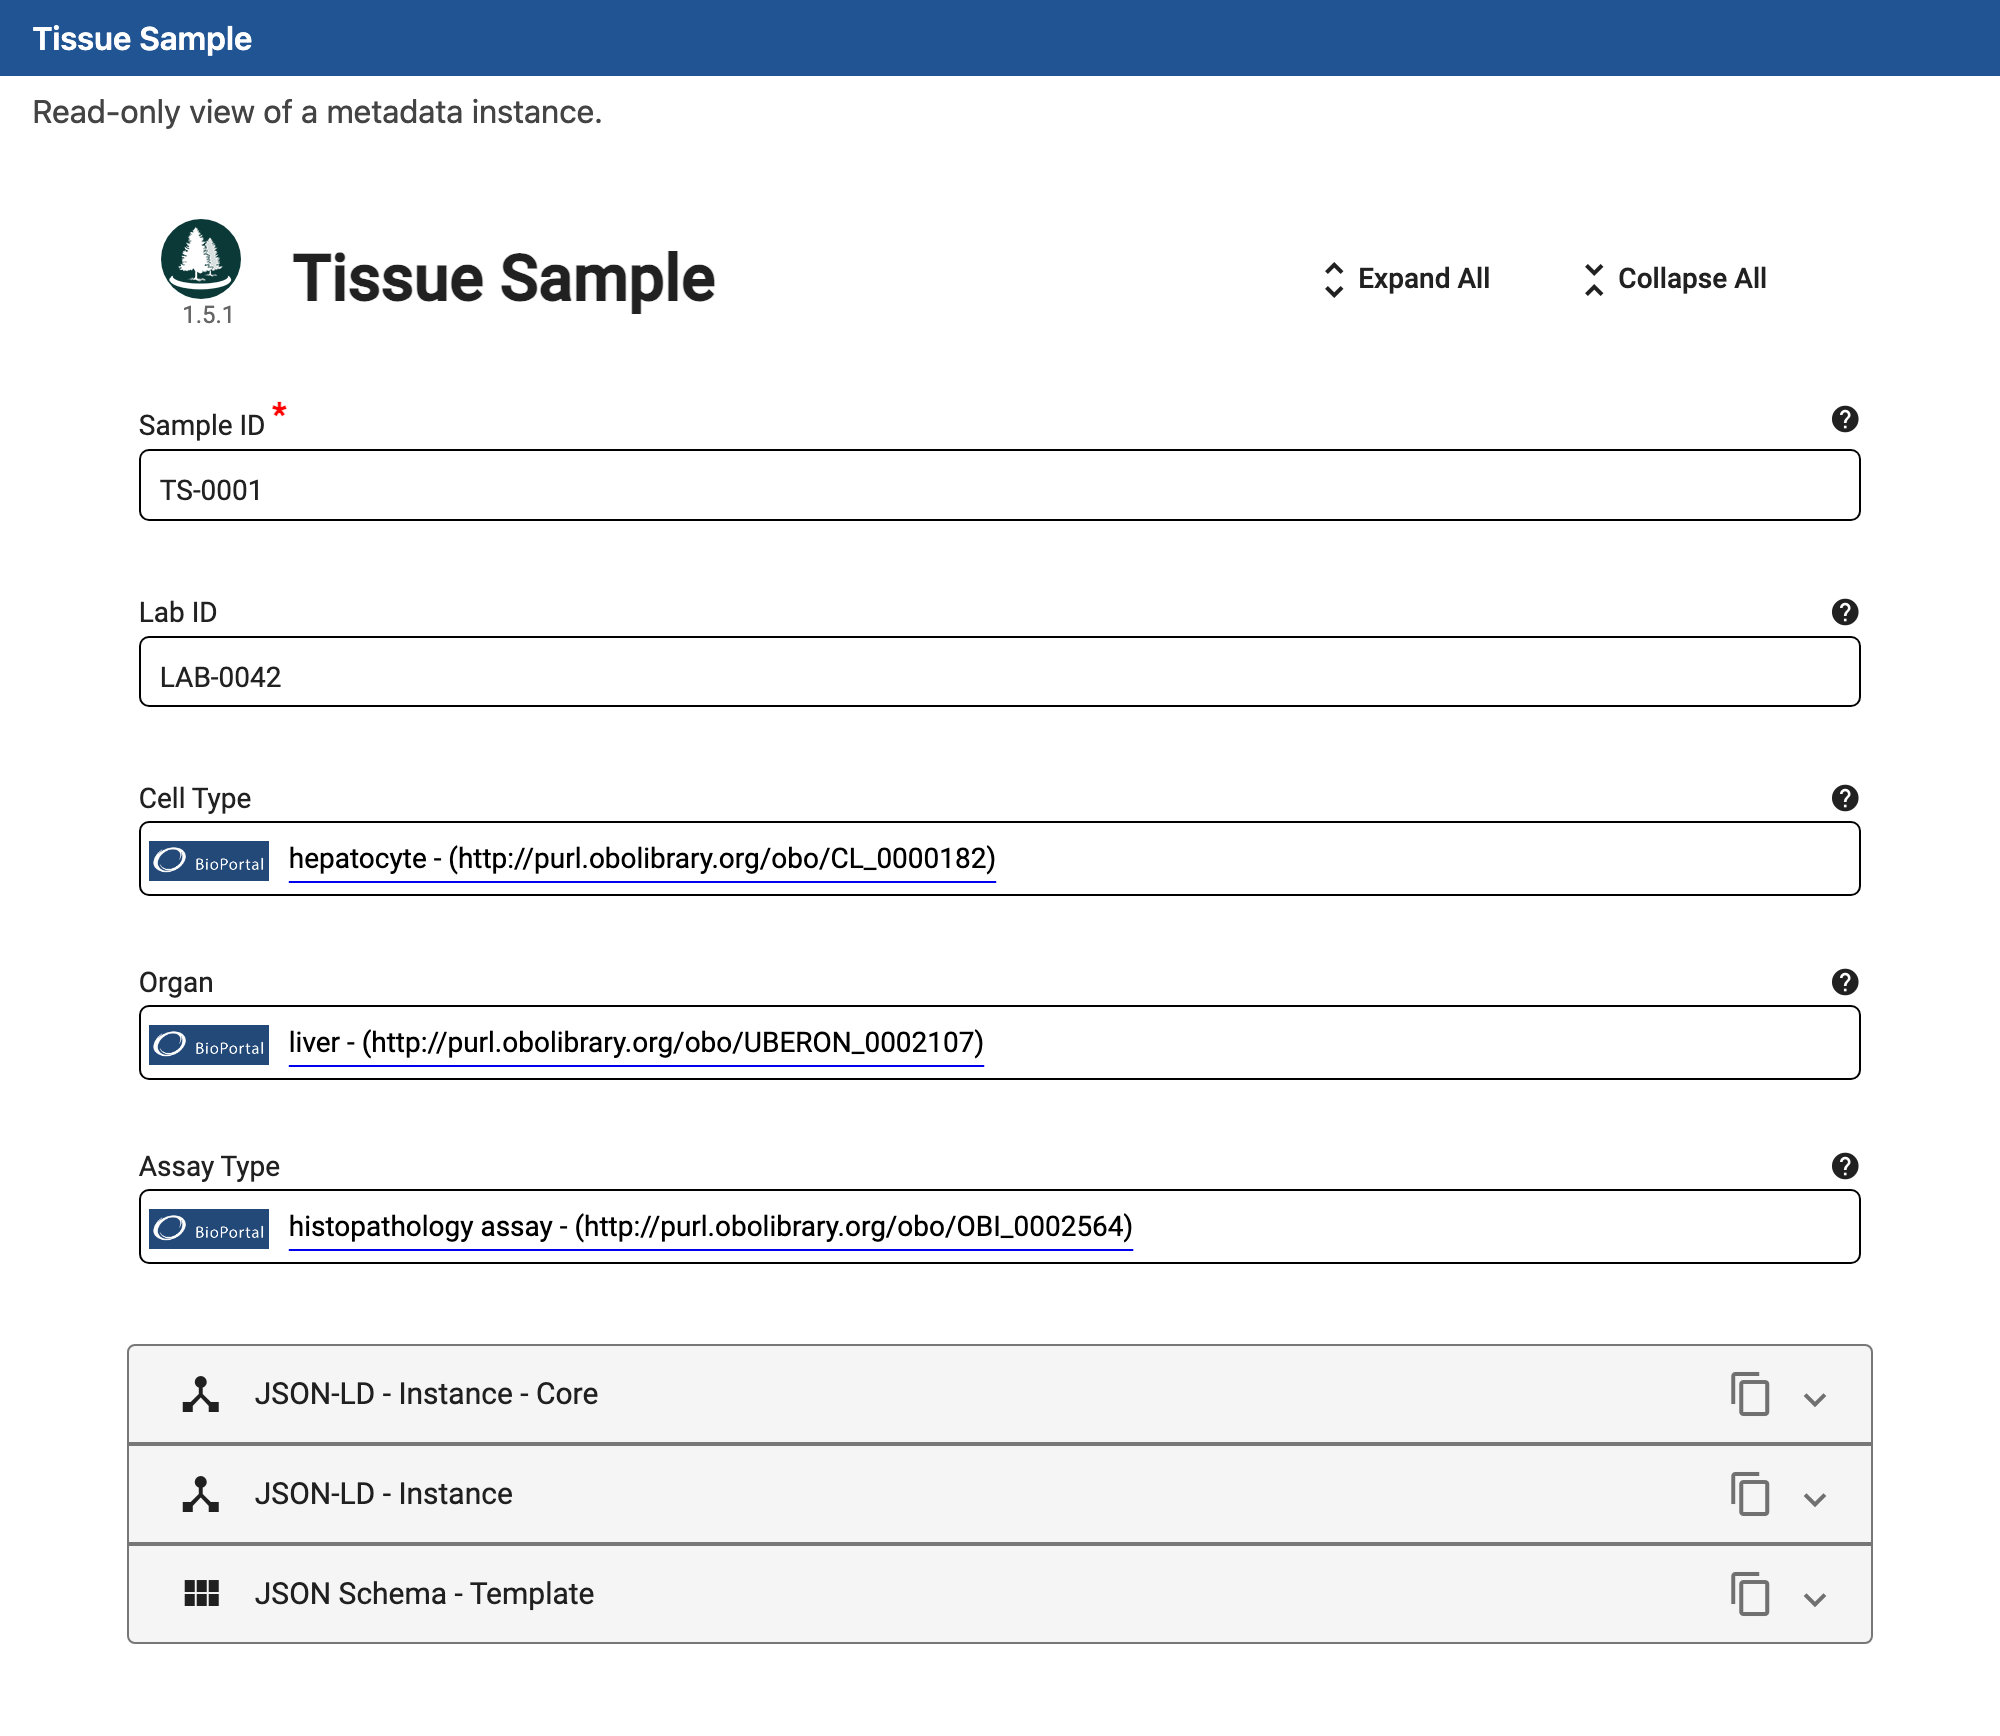
Each controlled value carries a BioPortal badge and shows its IRI. That is the
whole point. The instance stores hepatocyte as CL_0000182, not as the loose
word "hepatocyte", so the value means the same thing to every reader and every
program that encounters it.
Save to CEDAR
Everything so far has happened locally, on your machine and in your browser, without touching a server. When you want to keep what you built and let others find, fill, and reuse it, the CEDAR REST server uploads the template and the instance to a CEDAR account. It takes the same YAML you already have. That step is optional, and this tutorial stops short of it: the aim here is the construction, not the storage.
What Just Happened
The work split cleanly in two. The model supplied the judgment: which fields the template needs, which vocabularies fit them, and which shape of constraint each field should take. The servers supplied the ground truth: real IRIs from BioPortal, a valid schema and a valid instance from the CEDAR artifact server, and a faithful rendering from the embeddable editor. Neither half is enough alone. The model without the servers invents identifiers; the servers without the model have nothing to assemble.
Because the workflow is a conversation over reusable tools rather than a one-off script, the same method retargets to any study. Change the description of what you want, keep the approach, and the servers keep the output honest.
Appendix: Configuring the MCP Servers
Each server is a standalone MCP server that your assistant launches over stdio. You register the four in your client's MCP configuration once. The shape is the same across MCP-capable clients (Claude Desktop, Claude Code, and others); the launch command and paths depend on how you installed each server. A representative configuration:
{
  "mcpServers": {
    "bioportal-term": {
      "command": "uv",
      "args": ["--directory", "/path/to/bioportal-term-mcp", "run", "bioportal-term-mcp"],
      "env": { "BIOPORTAL_API_KEY": "your-bioportal-api-key" }
    },
    "cedar-artifact": {
      "command": "java",
      "args": ["-jar", "/path/to/cedar-artifact-mcp.jar"]
    },
    "cedar-cee": {
      "command": "java",
      "args": ["-jar", "/path/to/cedar-cee-mcp.jar"]
    },
    "cedar-artifact-rest": {
      "command": "java",
      "args": ["-jar", "/path/to/cedar-artifact-rest-mcp.jar"],
      "env": {
        "CEDAR_API_KEY": "your-cedar-api-key",
        "CEDAR_BASE_URL": "https://your-cedar-server"
      }
    }
  }
}
A few notes on credentials:
BIOPORTAL_API_KEYcomes from your BioPortal account and lets the term server query BioPortal.- The artifact and embeddable-editor servers need no credentials. One builds, validates, and renders locally; the other renders locally in your browser.
- The REST server needs a CEDAR API key and the base URL of your CEDAR server. It is required only if you save artifacts, as in Save to CEDAR.
After adding the block, restart your client. The assistant then has the tools
this tutorial used, from find_class and set_branch_constraint to
show_template, ready to call.