Building Basic Templates
The component templating resources can be shared with other users, published on the Web as JSON Schema, and reused within other Metadata Templates and Elements.
And of course, the completed Template generates the metadata form interfaces for metadata authors to fill out with rigorous semantic metadata.
First Steps
In the first steps to create a CEDAR Metadata Template resource, you will provide a human-readable label, a unique identifier, and a description of what the Template resource represents (e.g., "Injury-related treatments").
To create a new template, first click the "New" button on the Desktop's navigation sidebar (upper left of the Workspace view) and select the "Template" option in the dropdown menu. This step opens the Template Designer as shown below.
Enter the human-readable Name, Identifier and Description of the Template resource using the three text input fields ('Untitled', 'Identifier', 'Description') underlined in the image below. The Name is used as the name of the artifact in the Desktop, and can be changed from the Desktop view.
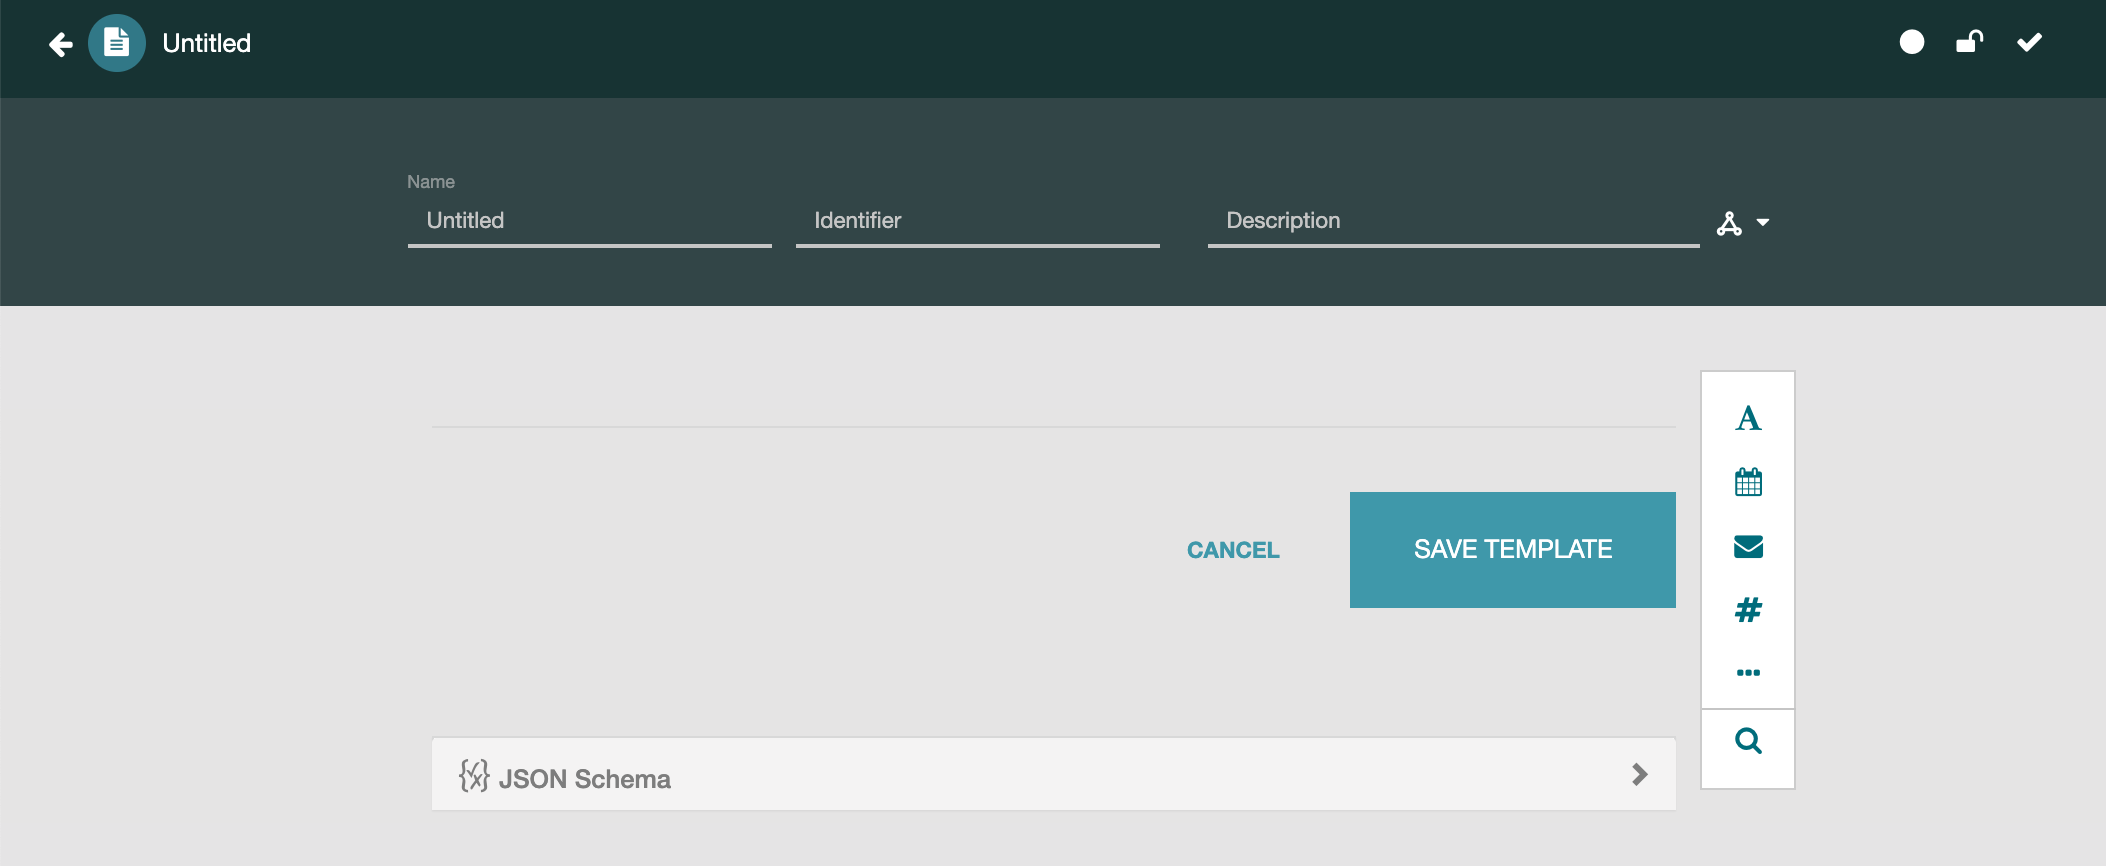
You can save and close your Template at any time and return to it later. You can open it for viewing or editing (or any other Template for which you have those access privileges) by double-clicking on its icon in the Desktop.
Useful Content Tips
By default CEDAR searches look at the artifact Name, Identifier, Description, and Version fields for matches, so consider what terms will be most important to include for searches to find your template.
Name: The name of the template should fit easily into the Workspace view if possible, keeping in mind that CEDAR names metadata instances by appending 'metadata' to the template name. The Name is analogous to the title of a web page. As a rough guideline, allow about 40-50 characters for your label.
You don't need to append 'Template' or 'Form' to the end of the label; this will be clear from context.
Identifier: For CEDAR templating artifacts, the Identifier refers to an external identifier of an artifact corresponding to this template, not a CEDAR identifier. You do not have to create an identifier; in fact, typically you will leave this field blank. The attribute is provided for users who want to identify an external entity associated with this template. The Identifier works best when unique identifiers for the external objects can be automatically assigned and persistently maintained. (Please note this Identifier corresponds to the template, not for the metadata instances filled out for this template.)
Description: This description can be any length;
a sentence or short paragraph is common.
Describe the subject that the template is documenting;
since we already know from context this is a CEDAR template,
you don't have to include that in the description.
Of course we also know it describes metadata,
but "Metadata describing …" often offers a useful setup for your description.
Because Description is a longer field, it is a good place to include key words or other information you want to be able to search on to find this field.
Next Steps
Now, you can fill in the content of your template by Adding Fields and Adding Elements, or save and close it to return to it later.
Adding Fields
Fields can be added to a CEDAR Template in two ways: by importing a stand-alone Field artifact which was created separately, or by defining a field within an Element resource or a Template resource. (We refer to stand-alone CEDAR Field artifacts throughout this User Guide with a capital 'F', and refer to field definitions within templating artifacts with a lower-case 'f'.)
Creating Field Content in a Resource
While specifying a field in a templating resource (a Template, Element, or Field), you can customize the Field resource in a number of ways, including constraining the values that metadata editors can input when they enter their metadata for the field. Some customizations apply to almost every field type; others are only allowed for one or two field types.
In Template and Element artifacts, multiple fields can be added; in a Field artifact, only one field can exist, and it must be a data input field.
You organize Fields and Elements in your templating resource by dragging them where you want them. Use the drag handles at the upper left of a Field or Element to grab it, and drag up or down. If you have trouble dragging it to the desired location, try shrinking the view within your browser to put more of the template on the screen. (Note: You can not change or organize content in an imported Field or Element.)
Adding a Field Definition
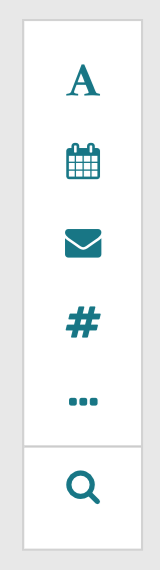 Choose the type of field to add to your templating resource
using the vertical selector at the upper right of your Template Designer window.
The first few choices give you simple ways to add
simple text, date, email, and numeric fields to your Template resource.
Choose the type of field to add to your templating resource
using the vertical selector at the upper right of your Template Designer window.
The first few choices give you simple ways to add
simple text, date, email, and numeric fields to your Template resource.
If you want a less common field type—including organizing and documentation fields— click on the ellipsis (three dots) icon to bring up many more field choices. The choices on the left are fields for data entry; the choices in the right column allow the template author to customize presentation of the template to the metadata creator.
The search (magnifying glass) icon brings up a window to find other CEDAR templating resources—Elements or Fields— that can be imported into the resource you are editing. Use of this window is described in Adding Elements
Choosing and Configuring the Field Definition
For each data-entry field type, CEDAR supports certain options. For example, the Required option is offered on every data-entry field type. You can find simple information about a few key field types below, and detailed information about field types and their customizations in the Field Type Reference.
Common Options
In addition to the Required option mentioned above, many fields support the Multiple option.
Required
If this option is set to Yes, the Metadata Editor indicates to the metadata author that the field is required, and issues a warning when the metadata is saved but this field has not been filled out with metadata. The metadata author can choose to ignore the warning and save the metadata even though the required field is not completed.
Multiple
When Multiple is set to Yes, the Template Designer displays a control to define the minimum and maximum number of entries allowed for the field.
If Multiple is set to Yes, then the Metadata Editor provides an interface to fill out the field multiple times. The Metadata Editor requires the minimum number of cells for that field to be present (though they do not have to be filled out with values), and prevents more than the maximum number of entries by making the Copy icon unavailable).
Value Relation
The Value Relation optionally defines for every metadata-entry field
the relationship from the field's parent entity (the Template, or the Element)
to the field's value. For example, when the Value Relation is 'has study characteristic'
from the Ontology for Clinical Relations (http://purl.org/net/OCRe/OCRe.owl#OCRE406000),
the resulting metadata will be readable as
<ParentElement> has_study_characteristic <user-selected-value>
To select a Value Relation, click on the RDF icon at the right side of the field. This brings up a search field that allows you to choose an appropriate Value Relation. (If the search brings up Classes instead of Properties, click on the Start Over button to clear the previous search.) Once you select a property, you are returned to the template. The selected property can be viewed by clicking on the drop-down arrow next to the RDF icon. (Clicking on the RDF icon again will clear any existing property and begin a new search.)
Configurations for Basic Text Field
Clicking on the Options tab presents additional features appropriate to the field type.
Options—Default Value
The Default Value option specifies the value for the field if the metadata author does not add a value to that field when filling out the metadata. The value can be either a string or a controlled term (expressed as an IRI).
Options—Minimum/Maximum String Length
With this option you can set a minimum length for the string, a maximum length for the string, or both. Users filling out the metadata will see a warning if the metadata is saved while the value in this field has a text length that does not satisfy the criteria.
Values
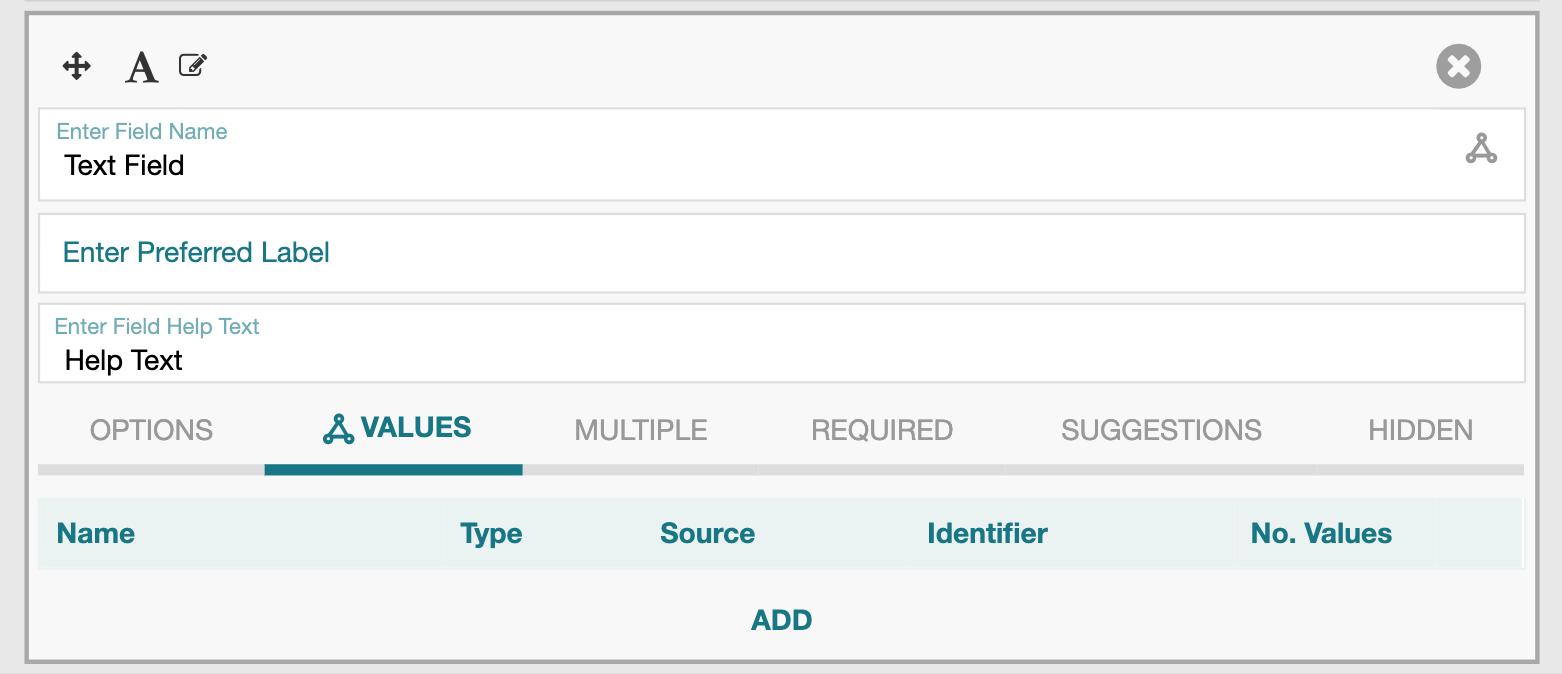 The Values tab shows a view of the current value set(s) that the metadata author
can use to fill out a text field. If no selections are listed, the metadata author
is prompted to enter free text.
The Values tab shows a view of the current value set(s) that the metadata author
can use to fill out a text field. If no selections are listed, the metadata author
is prompted to enter free text.
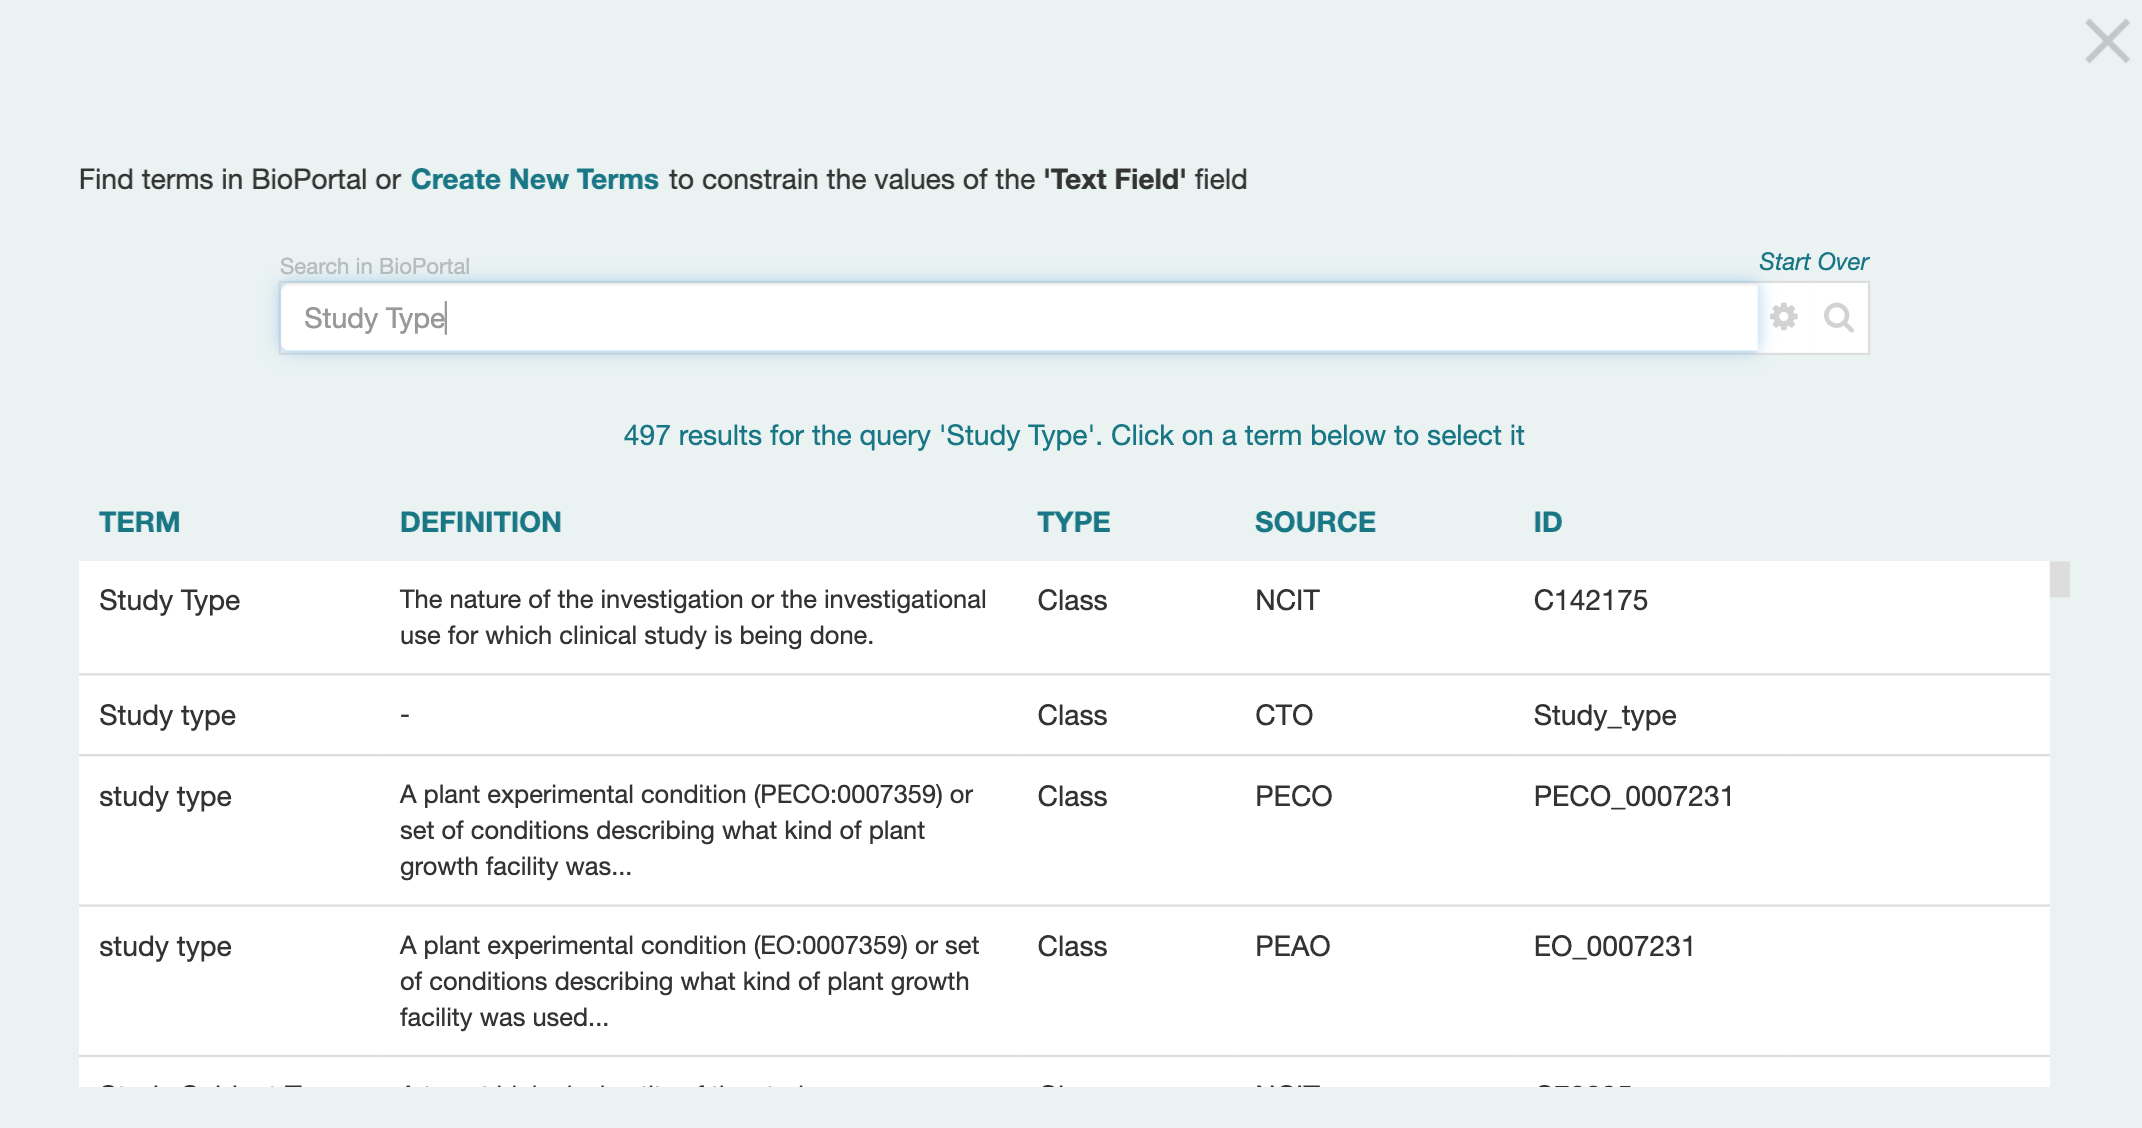 Clicking on the Add button brings up a modal window
from which you can select the term, branch, or ontology
from which legal values may be chosen by the metadata author.
You can repeat this process as often as you want to select additional
terms, branches, or ontologies.
Clicking on the Add button brings up a modal window
from which you can select the term, branch, or ontology
from which legal values may be chosen by the metadata author.
You can repeat this process as often as you want to select additional
terms, branches, or ontologies.
Advice about finding and choosing controlled values is available in the Choosing Controlled Terms section.
Suggestions
Set the Suggestions tab to Yes to enable intelligent authoring suggestions for this field from CEDAR. You can read a detailed explanation of the suggestions system at Understanding the Suggestion System.
Options for Numeric Fields
Number Type
CEDAR provides a default numeric field, whose values can be entered as either an integer or floating point number. As a template creator you can also choose a more specific number type for this field.
To select a specific number type for the field, click on the drop-down menu labeled 'Any numbers'. Select from the list of number formats, including long-integer numbers, integer numbers, double-precision real numbers, and single-precision real numbers. Your choice will be reflected in the JSON value type used to describe the number field in the template (JSON Schema), and to specify the entered value in the metadata (JSON-LD).
Unit of Measure
You can specify the unit of measure as a string. The string will be displayed to viewers and editors of metadata created using this field, both before and after a value is entered for the field.
Minimum/Maximum Value
You can specify a minimum legal value, a maximum legal value, or both. Users entering metadata will be warned in real time if entered values do not meet the field's value limit specifications.
Decimal Places
You can specify the number of decimal places used to display the value entered by the metadata author.
Creating a Stand-Alone Field
This process begins by creating the Field artifact, which is almost exactly like creating the Template artifact in First Steps. After that, the content of the Field artifact—the field definition— is created following the Adding a Field Definition subsection above.
To create a new stand-alone Field, click the "New" button on the Desktop's navigation sidebar (upper left of the Workspace view) and select the "Field" option in the dropdown menu. This step opens up the Field creation form as shown below.
Enter the human-readable Name, Identifier and Description of the Field
using the three text input fields ('Untitled', 'Identifier', 'Description')
underlined in the image below.
Note the Name is used as the name of the artifact in CEDAR,
and can also be changed from the Desktop.
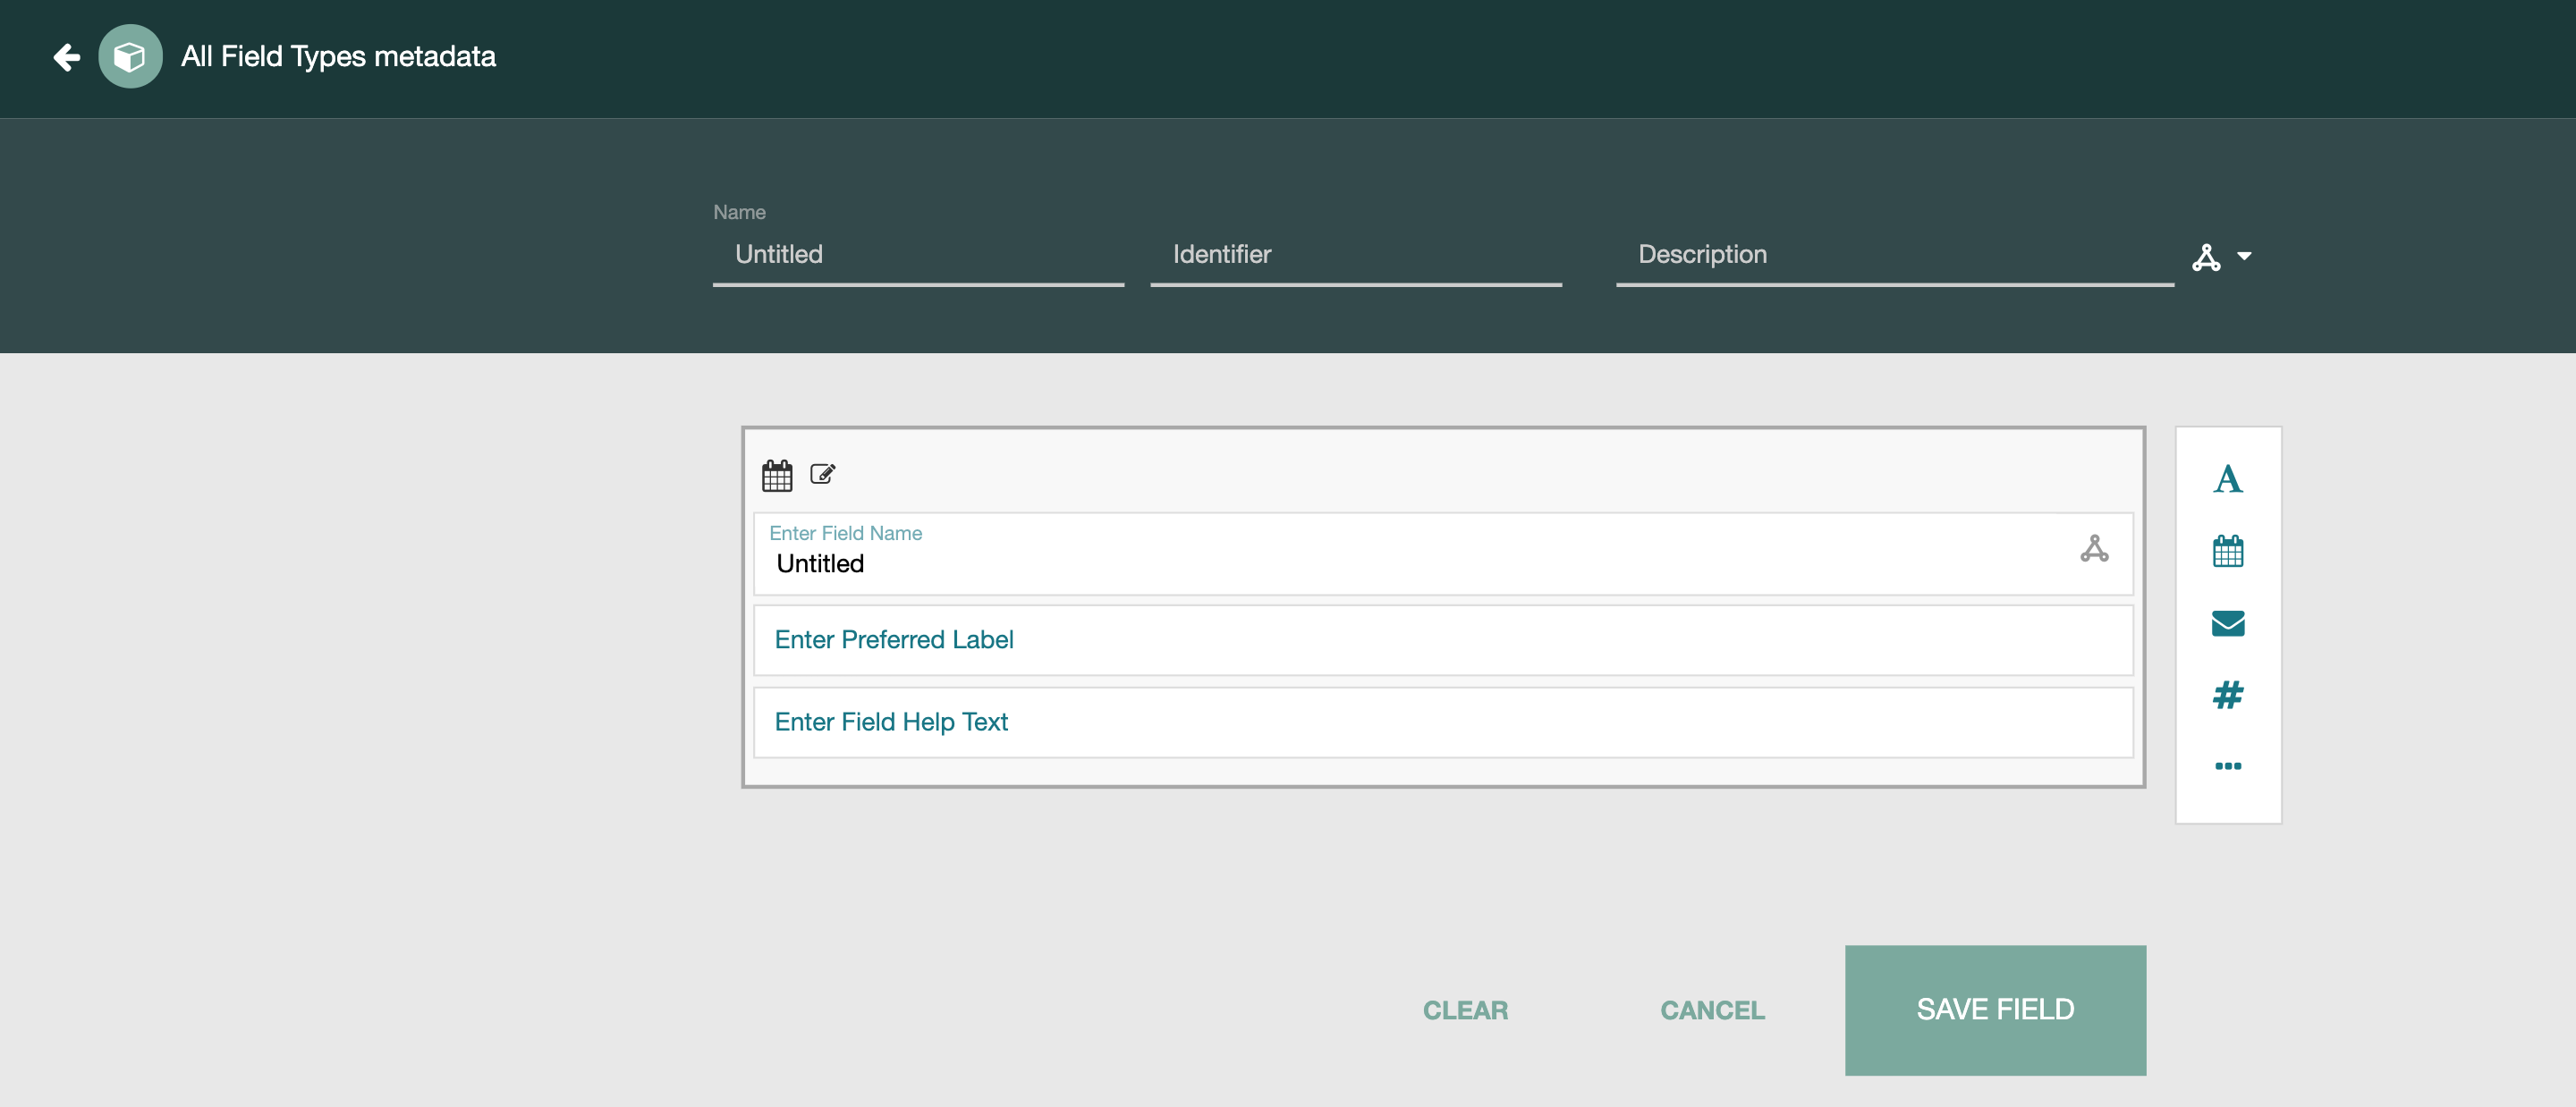
Now the content of the Field artifact—the field definition—can be created. Since only one field specification can be in a Field artifact, the Field template opens with a text field type already selected. If you want a different field type, simply select it from the drop-down menu, and the existing field definition will be replaced.
At any time during or following the Field artifact's creation, you can save the artifact and use the Template Designer's left-arrow to return to the Desktop. From there, you can modify the name, access permissions, and public visibility of the Field artifact, as described in Managing Resources.
Importing a Stand-Alone Field
Once the stand-alone Field artifact has been created,
you can import it into other Templates and Elements.
When you are editing a Template or Element,
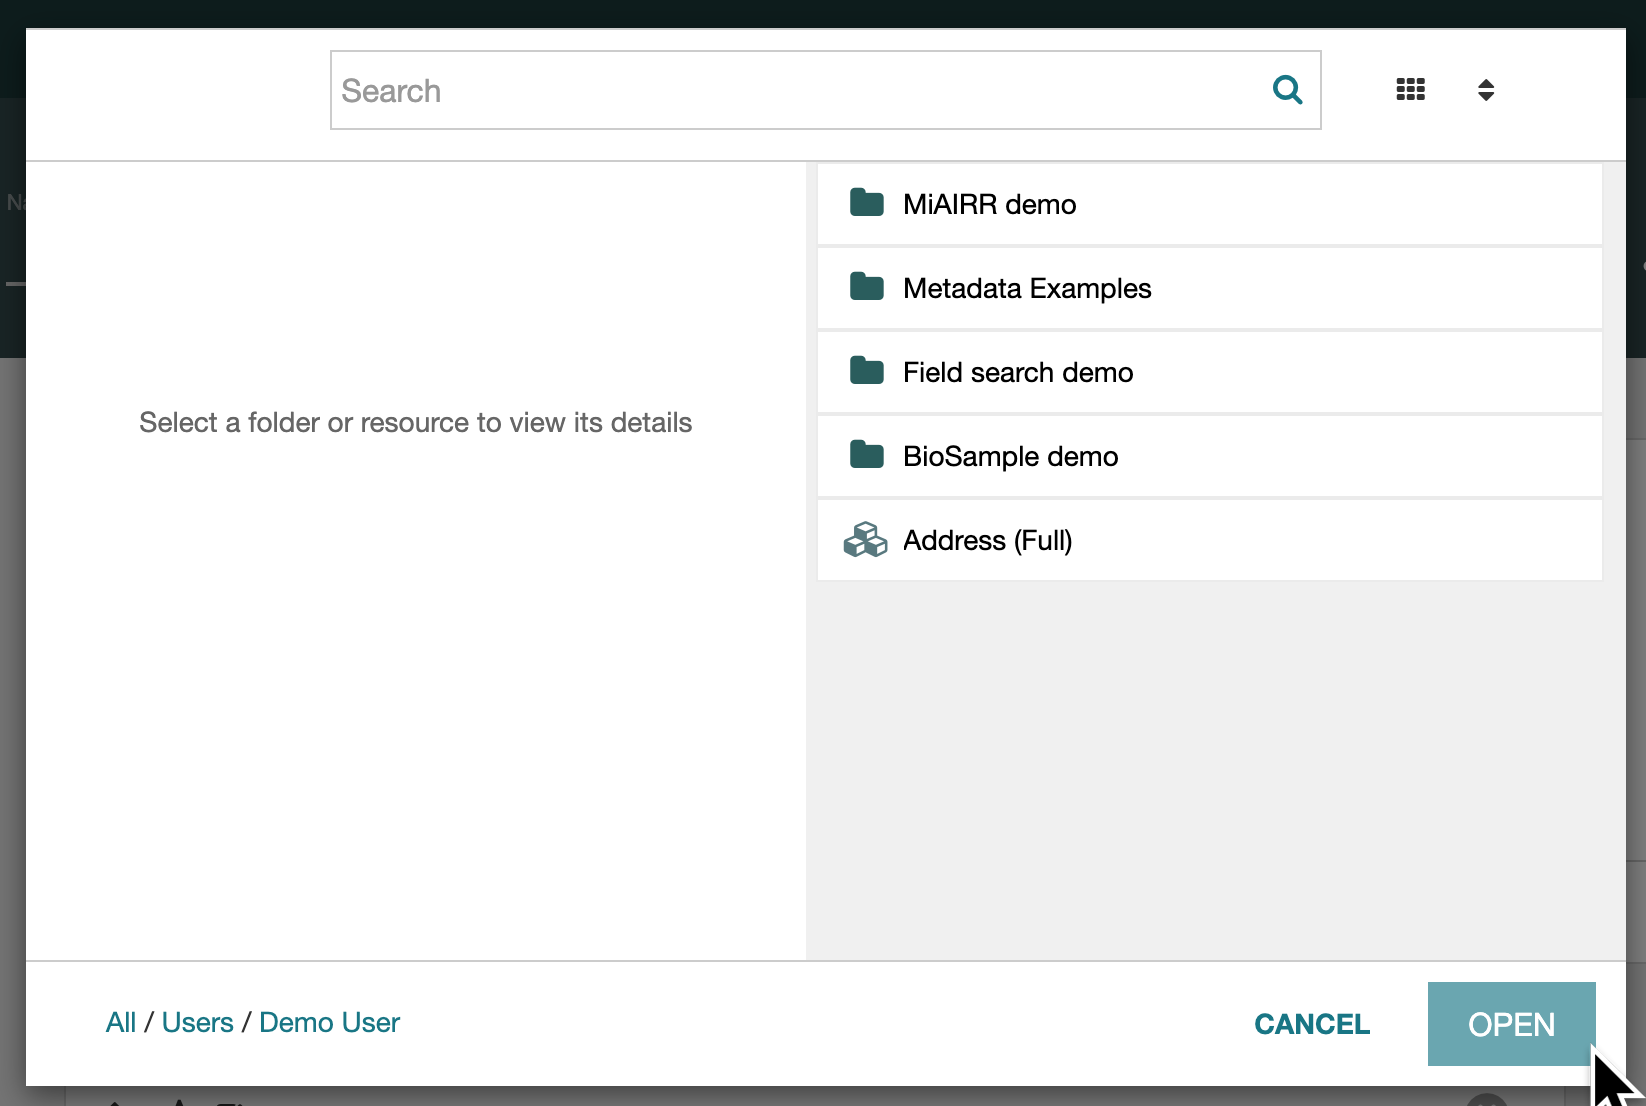
the search (magnifying glass) icon in the Template Designer's field addition menu
brings up a window to find other CEDAR templating resources—Elements or Fields—
that can be imported into the Element or Field you are editing.
Use of this window is described in Adding Elements.
Next Steps
You can fill in more content of your template by Adding Elements, or save and close it to return to it later.
Adding Elements
An Element resource is composed of field definitions (possibly imported within Field artifacts) and other Element resources. (CEDAR does not handle recursion in Element resources.) These Element resources enable Template creators to share, reuse, and extend existing Element resources across different Template resources and across user groups.
(1) First, we create a new Element resource. (2) We embed the newly created Element resource within our Template resource.
Creating a new Element Resource
To create a new Element resource, return to the Desktop if you are not already there. (Use the "Back" button in the Template Designer—you may be prompted to save the artifact you are currently editing.) Click on the "New" button in the navigation sidebar of the Desktop, and select the "Element" option from the dropdown menu. This action will launch the Element editor view of the Template Designer, as shown below.
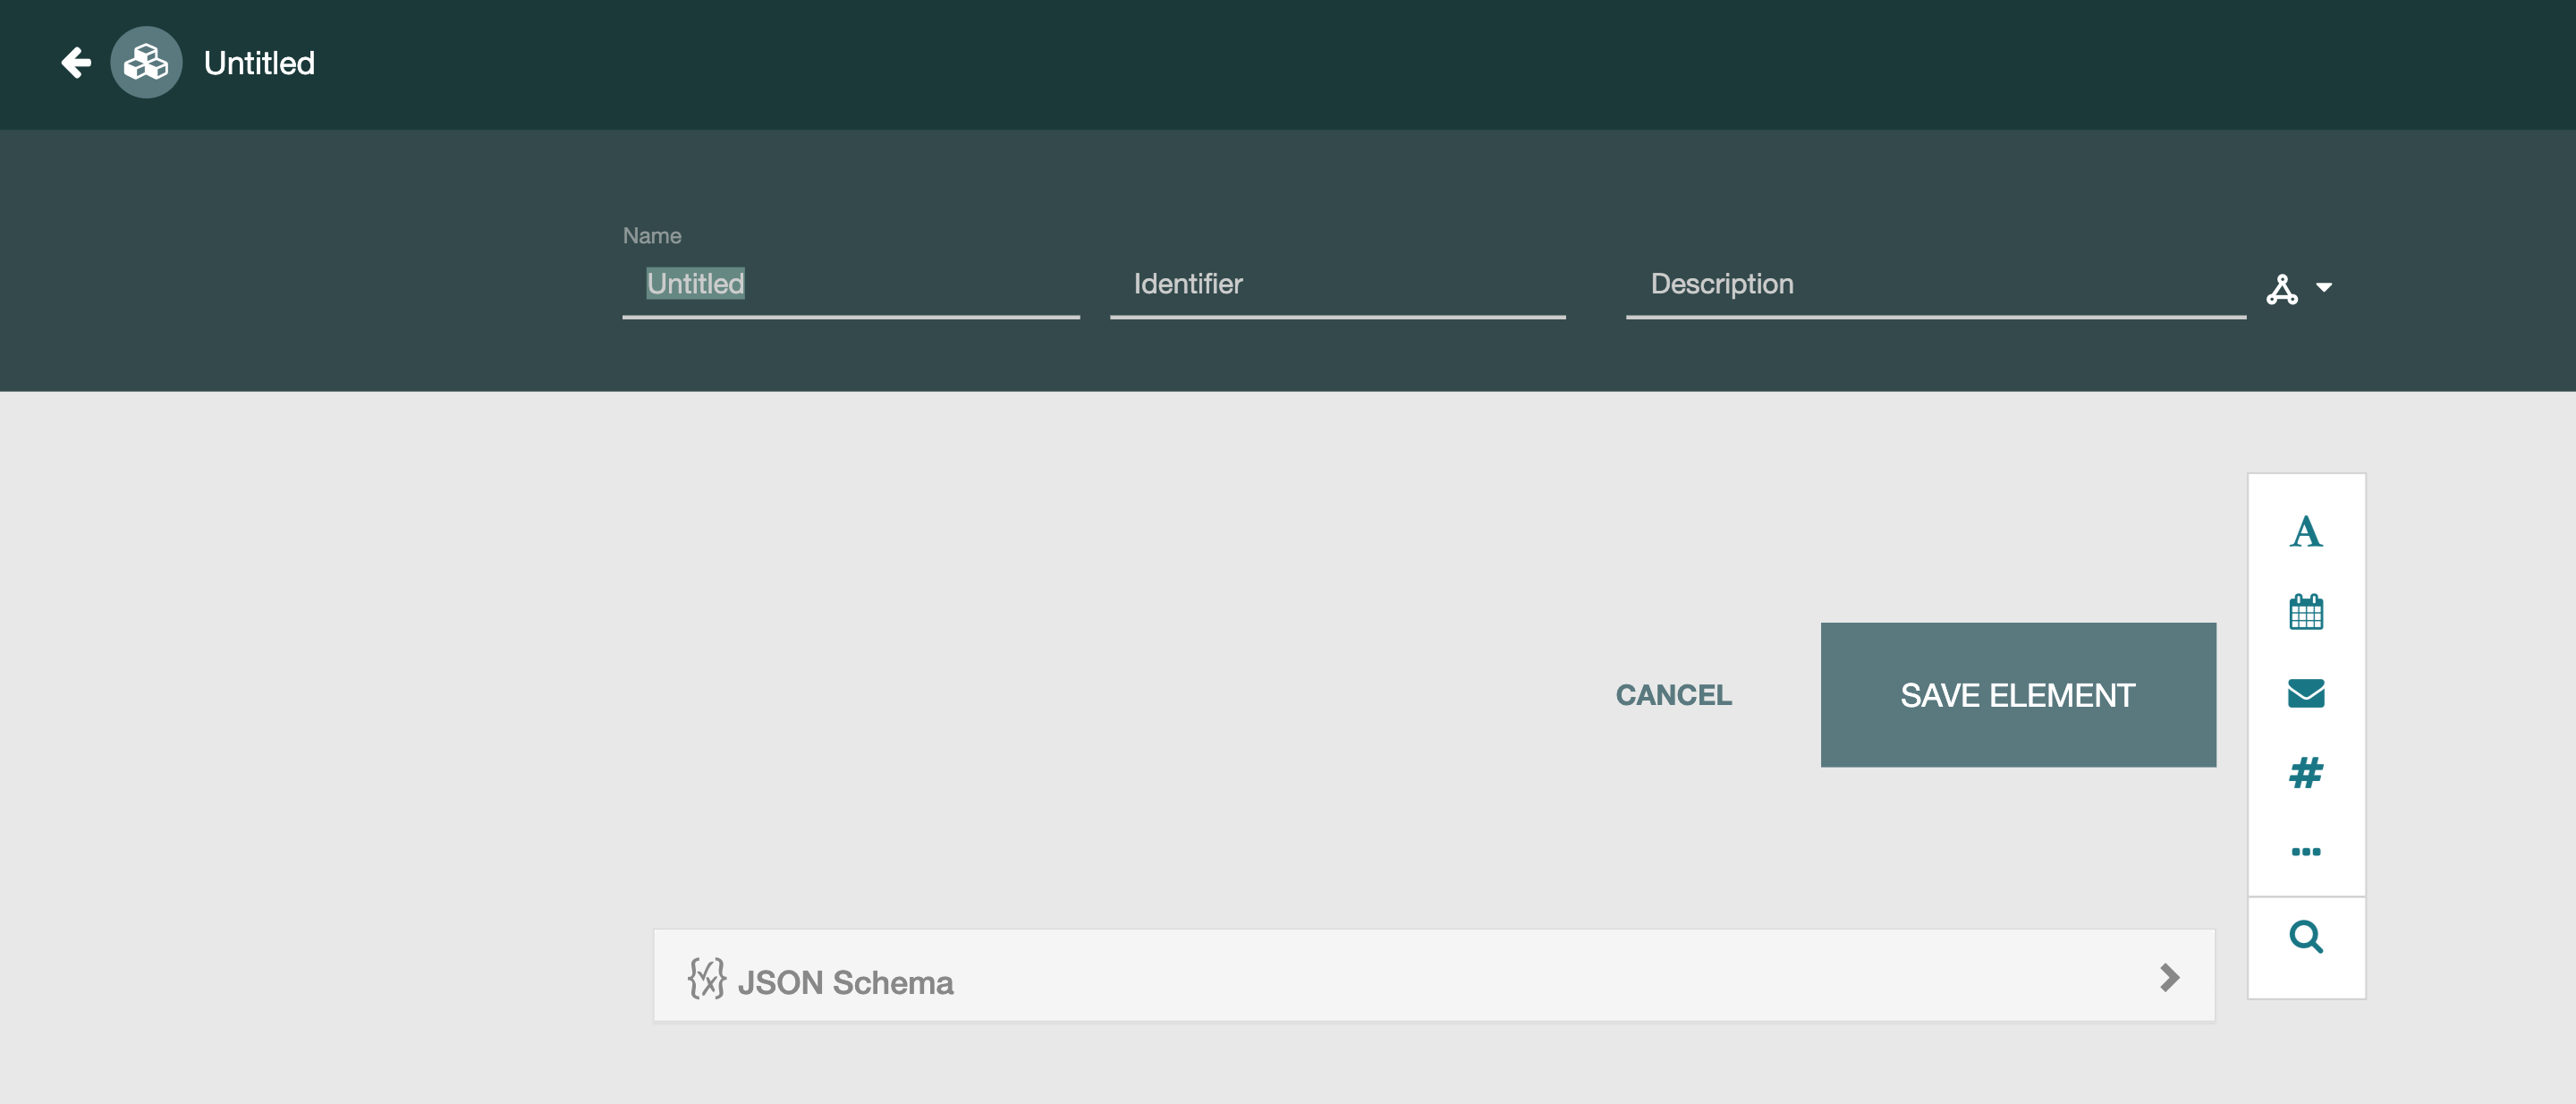
Enter the human-readable Name, Identifier and Description of the Field using the three text input fields ('Untitled', 'Identifier', 'Description') underlined in the image below. Note the Name is used as the name of the artifact in CEDAR, and can also be changed from the Desktop.
Now the content of the Element artifact can be created. Field definitions can be added directly, or by importing Field artifacts; instructions for both operations are found in the Adding Fields section.
Element content can also be created by importing existing elements, as described below.
At any time during or following the Field artifact's creation, you can save the artifact and use the Template Designer's left-arrow to return to the Desktop. From there, you can modify the name, access permissions, and public visibility of the Field artifact, as described in Managing Resources.
Spreadsheet-compatible Elements
If you want users to be able to fill out their metadata using a spreadsheet— especially valuable if there are a lot of fields to be filled out with existing metadata— you must create your element to satisfy a particular requirement.
An element that is to be filled out as a spreadsheet must be 'flat', meaning there are no further hierarchies or arrays within the element. Embedding another element, or allowing multiple entries for any of its entries, will prevent the user from displaying the element in spreadsheet mode. Also, the MULTIPLE attribute of the element must be defined to allow multiple entries.
The process of filling out the metadata using spreadsheet mode is described in Spreadsheet entry.
Embedding the Element Resource
When you are editing a Template or Element,
the search (magnifying glass) icon in the Template Designer's field addition menu
brings up a window to find other CEDAR templating resources—Elements or Fields—that
can be imported into the Element or Field you are editing.
The navigation path in the lower left of the window starts in the current directory (from the last Desktop view), and can be used to navigate to other locations in CEDAR. However, most users will find Elements and Fields by searching for them.
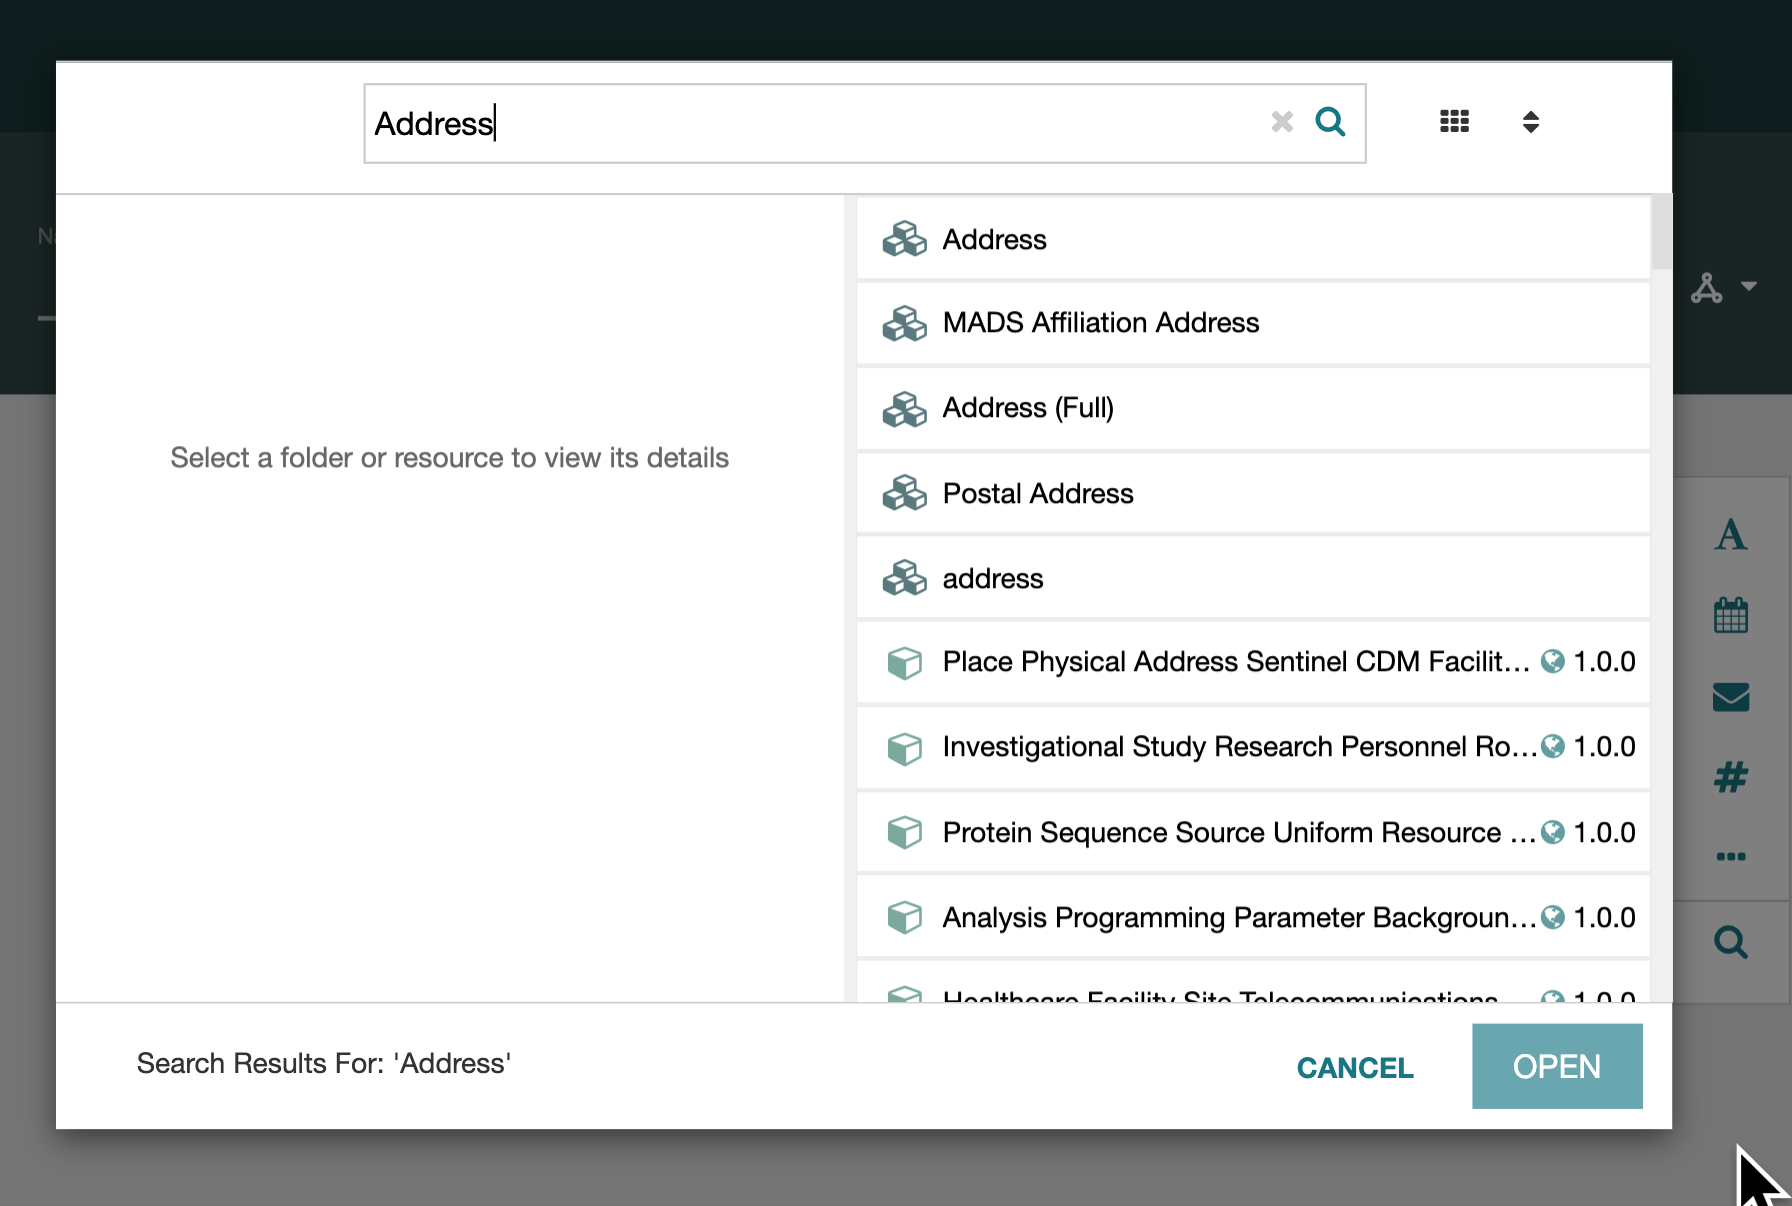
To perform a search, begin entering a search string in the search field of the window.
In the image below, 'Address' has been added and the search performed when the user
hit the return key. You can see that Elements and Fields are visible in the search results.
To investigate a particular discovered Element for suitability,
click on the Element to bring up its description, as seen below.
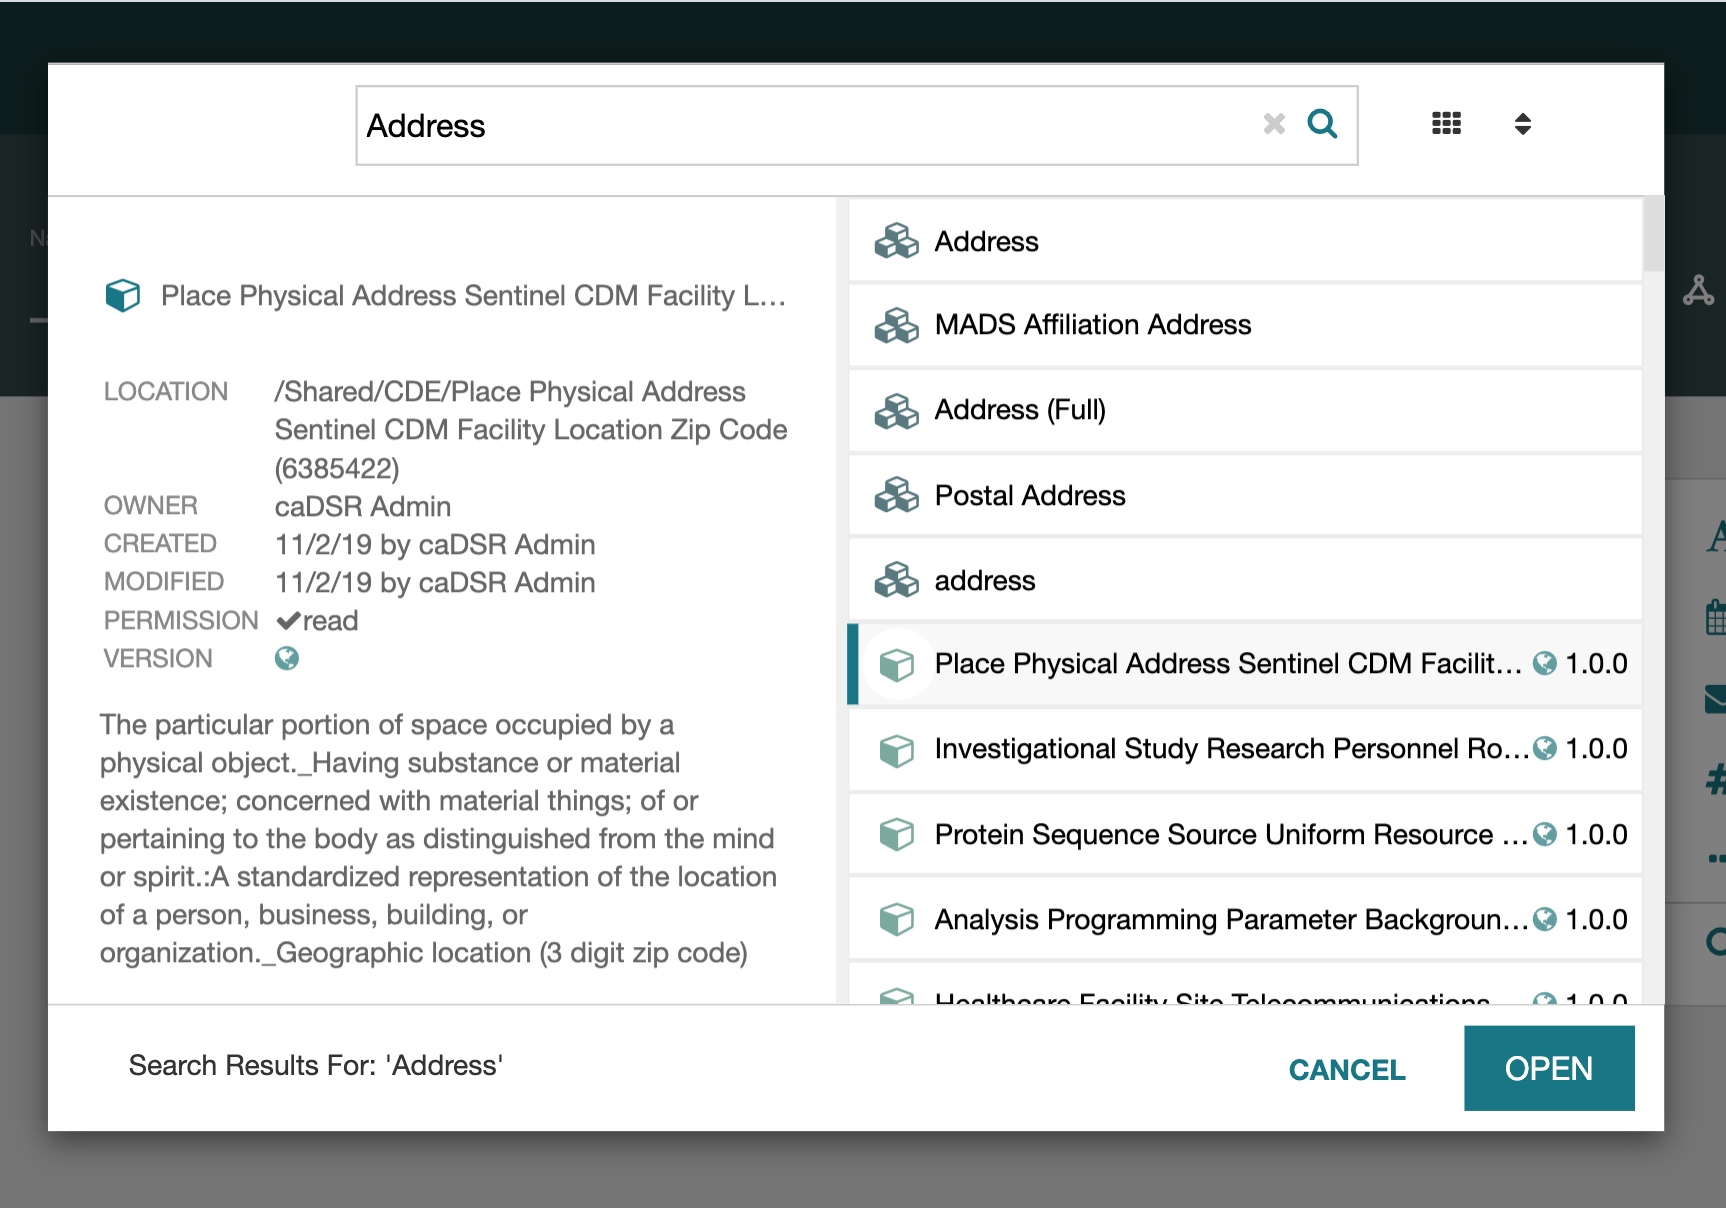
To embed an Element or Field artifact in your templating resource, either double-click on the artifact, or click once on the artifact and then click on the Open button. The Element or Field will be incorporated at the end of your templating resource.
Within the templating resource, you can not edit the core characteristics of imported content (the Element or Field), including the order of components within an imported Element. You will be able to relabel the imported content, and will be able to choose a property that relates the imported artifact to its parent.
You can move an any imported Element or Field in your templating resource by dragging it where you want it. Use the drag handles at the upper left of the Element to grab it, and drag up or down. If you have trouble dragging it to the desired location, try shrinking the view within your browser to put more of the templating resource on the screen. (Note: You can not change or organize content in an imported Field or Element.)
Saving and Closing
Saving
To save a templating resource—Template, Element, or Field—click on the Save button at the bottom right of the templating resource. This will be labeled Save Template, Save Element, or Save Field depending on the type of templating resource you are editing.
At the top right of the templating resource, there are 3 icons that indicate the resource status. The left-most icon (the circle) is filled when the instance has no unsaved changes, but is a hollow yellow circle when there are unsaved changes.
If the lock (the middle icon) is yellow and locked, you will not be able to save your changes, even to a separate file. To create an editable version of the resource, you will have to exit the resource, make a copy of it from the Desktop, and edit the copy you made.
Validation
CEDAR performs syntactical validation of a templating resource when it is opened and saved. This checks that the resource conforms to the Template Model schema, which is expressed as JSON Schema. The validation should always succeed and yields a white checkmark in the third icon. If the syntactical validation fails, the checkmark turns yellow, indicating there is a problem in the CEDAR system. Often you still will be able to work with the resource, but it is best to contact the CEDAR team to alert them to the problem.
On a successful verification, CEDAR issues a green "[Artifact] saved successfully" notification, where '[Artifact]' will be replaced by 'Template', 'Element', or 'Field'.
Closing
Saving before closing
While a templating resource is being edited in the Template Designer, it can be saved at any time.
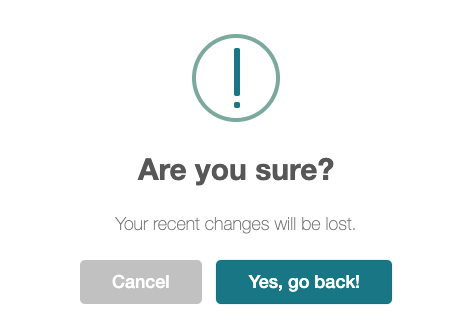 If you have made changes and try to leave the resource without saving it
by using the CEDAR back button,
CEDAR will issue a warning. If you click Continue, any changes you made will be lost
and CEDAR will return to the Desktop view.
Choosing the Go Back button will return you to the templating resource.
If you have made changes and try to leave the resource without saving it
by using the CEDAR back button,
CEDAR will issue a warning. If you click Continue, any changes you made will be lost
and CEDAR will return to the Desktop view.
Choosing the Go Back button will return you to the templating resource.
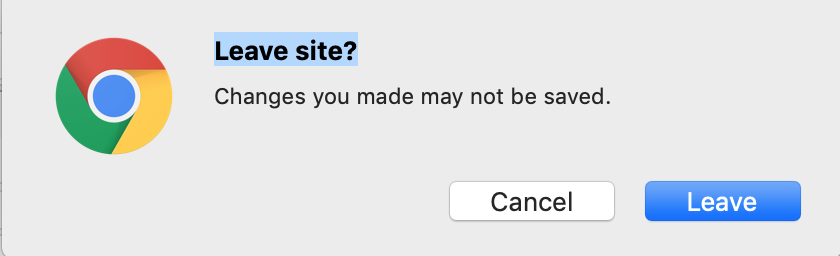 If you have made changes and try to leave the resource without saving it by using the browser back button or closing the browser window, the browser will issue an error message.
In Chrome, click on Leave Site (the default) to close the resource,
and on Cancel to remain on the page.
If you have made changes and try to leave the resource without saving it by using the browser back button or closing the browser window, the browser will issue an error message.
In Chrome, click on Leave Site (the default) to close the resource,
and on Cancel to remain on the page.
Because there might be unusual conditions that cause you to lose your session,
we strongly encourage you to save your work often.
We are unable to restore work that has been lost when the session is lost.
If you have remained on the page, you can save the resource and then return to the Desktop view or close the window.
Returning to Desktop
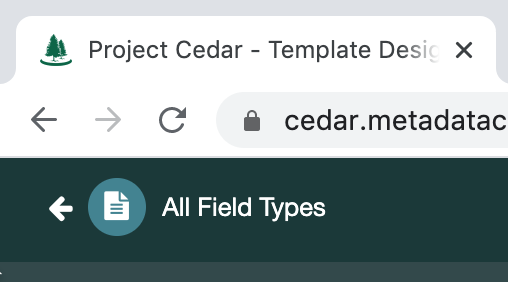 When you close the template to return to the CEDAR Desktop view,
there are two 'return left' buttons—the one in the browser,
and the one at the upper left of the CEDAR Template Designer.
The CEDAR button remembers the last folder you had open in the Desktop view,
ignoring any searches you may have performed since then.
When you close the template to return to the CEDAR Desktop view,
there are two 'return left' buttons—the one in the browser,
and the one at the upper left of the CEDAR Template Designer.
The CEDAR button remembers the last folder you had open in the Desktop view,
ignoring any searches you may have performed since then.
If you launched the Template Designer from a CEDAR search results page, and want to return to that page, use the browser back button, and the same search should be performed. (If you mistakenly chose the CEDAR back button, you can still use the browser button twice to get back to the previous search results.)
Recovering previous version
Because there is no undo, should you need to recover a previous version of the document, you can contact CEDAR staff to restore a version from before the time you started editing. If you plan to make significant changes to a template, especially if you are experimenting with it, we recommend saving a copy before you start changing it.
Field Type Reference
Field Type Reference
While specifying a field in a templating resource (a Template, Element, or Field), you can customize the Field resource in a number of ways, including constraining the values that metadata editors can input when they enter their metadata for the field. Some customizations apply to almost every field type; others are only allowed for one or two field types.
All the customizations listed in the Reference tables are described after the Reference Tables subsection.
Reference Tables
The tables in this subsection show the field types that CEDAR offers, and the customizations or purpose supported by that field type.
Data entry fields
All data entry fields support the Required and Value Relation features, and all of them support the Multiple feature except those noted in the next table.
The following table lists CEDAR's supported customizations unique to each field type for data entry. It also shows the Data Type(s) used by CEDAR for those field types. If the Data Type(s) column is blank, the field type is the default (a text string).
| Unique Field Type | Data Type(s) | Unique Supported Customizations |
|---|---|---|
| Short Text | Values; Suggestions; Hidden; Default | |
| Paragraph Text | ||
| Phone | ||
| Link | ||
| Numeric | any number (xsd:decimal); integer (xsd:integer); long integer (xsd:long); single-precision real (xsd:float); double-precision real (xsd:double) | Unit of Measure, Minimum Value, Maximum Value, Decimal Places |
| Date | xsd:date | |
| Multi-Choice | Default; no Multiple | |
| Checkbox | Default; no Multiple | |
| Pick From List | Single Select vs Multi-Select; Default; no Multiple |
A special type of data entry field is the Attribute-Value field type, which lets the metadata author name the Attribute and provide the Value when entering the metadata. This field type allows multiple (unlimited) entries by design.
Special field types for presentation
The following special field types do not support data storage for the metadata creator, but allow the template author to customize presentation of the template to the metadata creator.
| Special Field Type | Description | Purpose |
|---|---|---|
| Section | Creates a section break | Provides a textual separator with optional explanatory text |
| Page | Creates a page break | Breaks up form into multiple pages (screens) when entering metadata |
| Rich Text | Support entry of rich text in HTML | Provide a descriptive lead-in to the following field for metadata creators |
| Image | Specify location of an image to display | Provide a static visual lead-in to the following field for metadata creators |
| YouTube | Specify location of a YouTube video to display | Provide a video lead-in to the following field for metadata creators |
Customization Descriptions
This subsection describes the field customizations, which are presented in alphabetical order by name.
Decimal Places (Numeric field Option)
You can specify the number of decimal places used to constrain and display the value
entered by the metadata author.
The metadata author will not be able to enter more decimal places
than the value specified by this option
(or if more decimal places are entered, the value will be rounded
to fit into the specified number of decimal places).
This customization has no impact if the Numeric field type is an integer type.
Default Value (Text field Option)
The Default Value option specifies the value for the field if the metadata author does not add a value to that field when filling out the metadata. The value can be either a string or a controlled term. The controlled term must be expressed as an IRI from BioPortal.
Minimum/Maximum Value (Numeric field Option)
For numeric fields, you can specify a minimum legal value, a maximum legal value, or both. Users entering metadata will be warned in real time if entered values do not meet the field's value limit specifications.
Minimum/Maximum String Length (Text field Option)
With this option you can set a minimum length for the string, a maximum length for the string, or both. Users filling out the metadata will see a warning if the metadata is saved while the value in this field has a text length that does not satisfy the criteria.
Multiple
When Multiple is set to Yes, the Template Designer displays a control to define the minimum and maximum number of entries allowed for the field.
If Multiple is set to Yes, then the Metadata Editor provides an interface to fill out the field multiple times. The Metadata Editor forces the specified minimum number of fields to be present (though the user is not forced to fill out the fields with values). The Metadata Editor prevents creating more than the maximum number of entries by making the field Copy icon unavailable.
Number Type (Numeric field Option)
CEDAR provides a default numeric field (decimal), whose values can be entered as either an integer or floating point number. (Exponential notation is not supported.) As a template creator you can also choose a more specialized number type for this field.
To select a specialized number type for the field, click on the drop-down menu labeled 'Any numbers'. Select from the list of number formats, including long-integer numbers, integer numbers, double-precision real numbers, and single-precision real numbers. Your choice will be reflected in the JSON value type used to describe the number field in the template (JSON Schema), and to specify the entered value in the metadata (JSON-LD). The Data entry field table in the Reference Tables section lists the specific JSON value types used for each case.
Required
If this option is set to Yes, the Metadata Editor indicates to the metadata author that the field is required, and issues a warning when the metadata is saved while this field has not been filled out with metadata.
The metadata author can choose to ignore the warning and save the metadata even though the required field is not completed.
Suggestions
Set the Suggestions tab to Yes to enable intelligent authoring suggestions for this field from CEDAR. You can read a detailed explanation of the suggestions system at Understanding the Suggestion System.
Unit of Measure (Numeric field Option)
You can specify a unit of measure for the field as a string. The string will be displayed to viewers and editors of metadata created using this field, both before and after a value is entered for the field.
Value Relation
The Value Relation customization provides a unique capability to the CEDAR metadata model for making metadata more semantic.
For every metadata-entry field, the Value Relation optionally defines
the relationship from the field's immediate parent entity
(either the Element containing the field, or if the field is at the top level,
the Template containing the field)
to the field's value. For example, when the Value Relation is 'has study characteristic'
from the Ontology for Clinical Relations (IRI of http://purl.org/net/OCRe/OCRe.owl#OCRE406000),
the resulting metadata will be readable as
<ParentElement> has_study_characteristic <user-selected-value>
where each of the 3 elements is replaced with its corresponding unique identifier (IRI).
To select a Value Relation, click on the RDF icon at the right side of the field. This brings up a search field that allows you to choose an appropriate Value Relation. (If the search brings up Classes instead of Properties, click on the Start Over button to clear the previous search.) Once you select a property, you are returned to the template.
The selected property can be viewed by clicking on the drop-down arrow next to the RDF icon. Do so carefully, as clicking on the RDF icon again will clear any existing property and begin a new search.
Values
The Values tab shows a view of the current value set(s) that the metadata author
can use to fill out a text field. If no selections are listed, the metadata author
is prompted to enter free text.
Clicking on the Add button brings up a modal window
from which you can select the term, branch, or ontology
from which legal values may be chosen by the metadata author.
After you've made the selection, you will be returned to the view of the field
which includes a line describing your selection.
You can repeat this process by (clicking the Add button) as often as you want to select additional terms, branches, or ontologies. You can remove any of the selected terms, branches, or ontologies by clicking on the X to the right of the row you want to delete.
Advice about finding and choosing controlled values is available in the Choosing Controlled Terms section.